There are several ways in which you can offer discounts and run promotions.
These range from one-off discounts for individual clients to accepting coupons as part of a promotional campaign.
Using pricing rules, you can implement discounts for groups of users or time-based discounts, such as seasonal discounts.
Furthermore, offering packages of credits at discounted prices can be an effective way of building customer loyalty.
Find instructions on how to set these discounts and promotions here:
There are three common approaches:
give an individual customer a discount or refund
offer a discount automatically through pricing rules or user groups
run a campaign using coupon codes or by providing a starting credit
There are essentially two types of discount that you can offer individual clients: a one-off discount or a standing discount.
While one-off discounts can be made to work with both online payment and credits, standing discounts only apply to online payments.
One-off discounts are also a way in which to provide refunds to your clients.
If you only need to compensate someone once, giving them a one-off credit is usually the simplest option.
If the same person should always receive a discount, use a standing discount instead.
Offering a one-off discount
In order to be able to offer one-off discounts and/or refunds, the credit system has to be enabled.
This can be done under Payment Setup.
More information on this can be found in the section about the credit system.
On the left-hand side of your Dashboard select the option User Management
Find the appropriate user, either by scrolling through the list or using the search function, and click the “edit” icon on the right of the user’s details
Add the discount to the value in the credit field.
The discount should be expressed in the same unit as the current credit, thus either in your local currency or as a number of credits
For example, if you want to give a client with a current credit of $20 a discount of $10, you change the value in the credit field from $20 to $30 (= $20 current credit + $10 discount).
Similarly, if your clients pay you with credits, and you want to refund someone 2 credits for a missed class, you can do so by adding them to their current credit level, i.e. current credit of 8 credits + refund of 2 credits = 10 credits
Press Update user
Setting up a standing discount
In order to offer particular clients a standing discount, you first need to add a supervisor field to a user’s profile.
On the left-hand side of your Dashboard select the option Access Control
Find the header Do you want to use a supervisor field? and change the setting from “N/A” to either “Hidden” or “Visible” and give the field a name, for example Standing discount.
In case you select “Visible”, the field is shown to the user, but they cannot edit it
Press Save changes. This returns you to the Dashboard
On the left-hand side of your Dashboard select the option User Management
Find the appropriate user, either by scrolling through the list or using the search function, and click the “edit” icon on the right of the user’s details
Navigate to the supervisor field, which is labeled with the name you gave it in step 2
Put in –x%, where x is the discount percentage. Note that the discount only gets applied at checkout and that it does not apply when the user books with credit
Structuring discounted credit packages
Offering credit packages at discounted prices can be an effective way of building customer loyalty.
All you need to do is to make at least one such package available in your webshop.
You can simply edit your existing prices or add one or more new products to your webshop.
Adding a new discounted credit package to your webshop
Assuming that you already added items to your webshop for any of your schedules, go to your Dashboard and select the option Shop Management under the section Applications.
This takes you to the Shop Management screen
Press New product and fill out the fields as desired.
For example, in order to create a ‘9+1’ package of 10 credits, which would normally cost $10 each, and price it at $90, you would put 90.00 in the price field and 10 in the credit field
Press Create product
Adding discounts based on User Groups
You can assign customers to user groups.
The user groups allow you to limit which schedules can be accessed by the members of the group, but they can also be used to provide a discount to a specific group.
First, it’s possible to create a pricing rule which reduces the price for people in the group (or raises the price for people not in a group).
Secondly, you can create an entirely separate schedule for a group.
This group can then have its own pricing, but you can also change other settings. For example, you can limit how long it can be booked in advance.
To make this second approach work you would need to connect the schedules so that no double bookings can occur.
This means that you would want to use a Resource schedule in combination with a Service schedule.
Offering discounts based on time
Using pricing rules, you can implement discounts based on a wide range of time-based discounts, such as “happy hour” pricing, or a weekend or seasonal discount.
Setting up time-based discounts is no different from using pricing rules to create calculated prices.
The example below shows how pricing rules can be used to implement a weekend discount/premium.
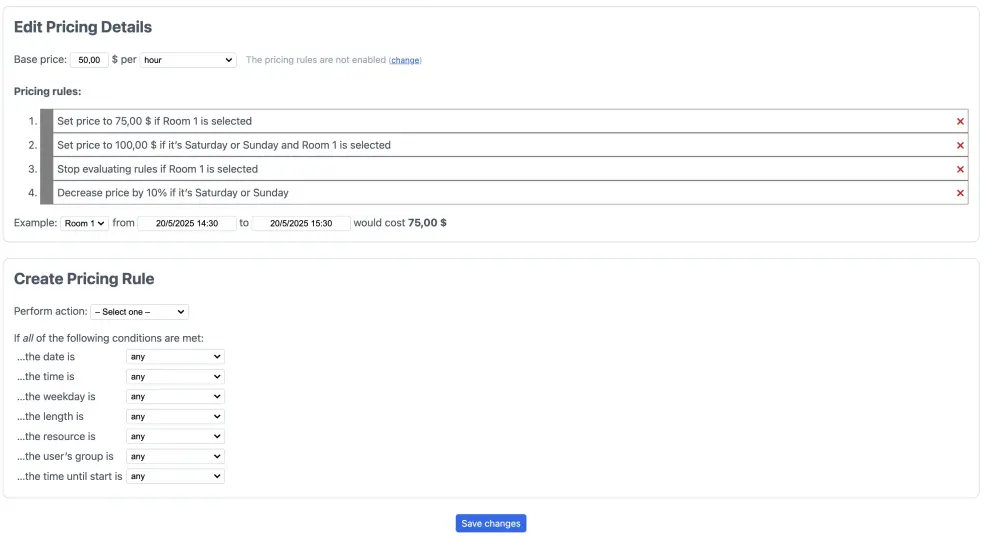
Example: Setting up a weekend discount/premium
Let’s assume we have 3 rooms available, which can be used for meetings, weddings, parties, etc. From Monday to Friday, Room 1 can be rented for $75/hour, while Room 2 and 3 are priced at $50/hour.
Over the weekend, however, the price of Room 1 is raised to $100/hour, while Room 2 and 3 are discounted by 10%. Implementing this pricing scheme requires four pricing rules as shown below.
Creating promotional coupons
Using coupons (or vouchers) is an effective way of offering discounts as part of an online and/or offline promotional campaign.
You can easily configure the SuperSaaS system to accept coupons during the booking process.
The system automatically checks whether offers are valid for the booking being made and keeps track of which codes are being used.
You can also use the SuperSaaS system to generate a batch of (single-use) coupons for use with, for example, daily deal sites like Groupon or LivingSocial.
Setting up a promotion
To be able to work with promotions, you first need to add a field to your schedule’s booking dialog that will hold the coupon code (aka “promo code”).
On the Configuration screen of your schedule, select the Process tab
Click the first of the two Customize links, to the right of the Additional text field under the header What information should the user enter with each reservation?
In the “Edit Custom Field” screen that now appears, make the following changes:
In “Name of the custom field”, enter something like Coupon code
Select Optional; if a coupon code is required for making a booking, select Required instead
Check This field contains a coupon code
Under Type of element, select Text field (one line)
Press Save changes. This will return you to the Configuration screen
On the Configuration screen, Overview tab, click the link Set up promotions, next to the Price field.
Note that this link is only visible if your schedule contains a coupon field
On the ‘Promotions’ screen, press New promotion to set up a new promotion/coupon code
In the pop-up that appears, enter the coupon code that you want to use for this particular promotion.
Any combination of numbers, letters and spaces is allowed, and the code is not case-sensitive
All remaining fields of the pop-up are optional.
The Description field allows you to enter a note to yourself; it is not shown to the client.
You can also enter a “magic word” here that limits where the promotion can be used (see below).
To make a promotion apply only to a specific schedule, resource, class or service enter the magic word $limit xxx in the Description field.
The promotion will only be valid if “xxx” appears in the schedule name or, depending on schedule type, in the resource name, the service name, the slot title or slot location.
On a Resource schedule the magic word can also be used to limit a promotion to a specific choice from the length selector, if that is enabled.
Note that if you use the length selector and have square brackets in the options then the $limit clause matches only on the value inside the brackets.
Buy one, get one free
You can limit the coupon to users who’ve previously created exactly two bookings with $limit=2.
And $limit>1 $limit<3 indicates the coupon only applies if more than one and fewer than 3 appointments have been made.
Note that the $limit only applies to the number of bookings in the schedule it’s being used on.
The other options, such as “Can only be used on the first appointment”, check for bookings across all schedules.
You can prevent a coupon from being used in a repeating appointment, by adding $limit=0 to the description.
To match schedule names with multiple words replace spaces with underscores, so to make a promotion apply only to the class “Intro course” use $limit Intro_course (the match is case-sensitive).
You can use multiple $limit clauses on the same promotion, for example to limit it to both to a specific class and a number of bookings.
The Valid from/to fields are used to specify the validity of the coupons.
Coupons can only be used with bookings made during this date range.
The bookings themselves, however, may lie outside this date range.
To restrict that date range as well, you can use the second set of date fields under “Usable”, labeled Can only be used for appointments between.
This allows you, for example, to create a coupon that applies to an event on a specific day only
In addition to a date, a date field can also contain a time.
This allows you to limit the validity or use of a coupon to a particular time window.
For example, 23/1/2026 09:00 and 23/1/2026 18:00 in the Valid from/to fields would create a coupon that can only be used during business hours on January 23rd, 2026.
Furthermore, by entering a time in both date fields, you can create a coupon that applies every day, during the time window specified.
This allows you, for example, to create a “Happy Hour” coupon
If you don’t want the system to check a particular limit, simply leave the related date field blank.
For example, by leaving both Valid from/to fields blank, you basically create an ongoing promotion: there are no limitations as to when the related coupon code can be used
The options under “Usable” specify how the coupon can be used. Firstly, you can specify how often the coupon can be used – unlimited, once or x times.
There is a subtle difference between a coupon marked as usable “once” and one that is usable “1 times”.
The coupon marked as usable “once” can be used on a repeating appointment, so it can be applied to multiple dates in one go (this assumes that you allow repeating appointments in your schedule).
In case of a coupon marked “x times”, however, the system will ensure that it is not used more than x times, including repeats.
Hence, a coupon marked “1 times” will only apply to the first appointment of a repeating appointment
The next three checkboxes allow you to put further restrictions on the use of coupons.
The first option ensures that each user can use the coupon only once, while the second option limits its use to the first appointment of a new user.
The last option lets you create a coupon code that can only be used by your superusers and administrators
As mentioned under 8, the set of date fields labeled Can only be used for appointments between can be used to restrict the use of a coupon for appointments within a particular date and/or time window
Finally, the checkboxes with day names allow you to create coupons that can only be applied to appointments on the days specified.
For example, by only checking the boxes Sat and Sun, you create a coupon that can only be used on weekend appointments
The Discount field allows you to apply a discount automatically, either as a percentage or as a fixed amount.
To create a coupon that entitles the user to a free appointment (the checkout process is skipped), enter a discount of 100%.
And if you want to create a coupon that does not provide a discount, but has some other benefit that is handled outside the SuperSaaS booking system, simply set the discount to 0%
Press Create promotion and the new promotion will appear in the list of available promotions.
Any invalid promotions/coupon codes will be displayed in gray, to indicate that it has expired or, in the case of single-use coupons, that it has been used already
Creating multiple coupons at once
There is a separate facility to generate multiple coupons with the same settings regarding validity and usability at once.
This is convenient, for example, when you offer a deal via Groupon or LivingSocial and need a batch of single-use coupons, which each have a different code and can be redeemed only once.
On the Configuration screen, select the Overview tab and click the link Set up promotions, next to the Price field.
Note that this link is only visible if your schedule contains a coupon field
On the “Promotions” screen, press New promotion to set up a new promotion/coupon code
Click the link Enter a list next to the Code field.
A text area appears that allows you to type a list of coupon numbers or, more likely, copy and paste a list of numbers from another program such as Excel.
All the options and restrictions that you define in the rest of the pop-up will be applied to each coupon
Press Create promotion and all the newly generated coupons will appear in the list of available promotions
Once you have more than a handful of promotions, a new Mass delete option will appear next to Create promotion.
When you click this link, you’re shown three options: Delete all codes, Delete used codes and Delete expired codes.
If you enter a search term, then the deletion options will apply to only the codes from the search result.
Note that removing coupons does not affect bookings that have been made using those coupons.
Testing the booking process using coupons
Once you have set up your promotion, it’s a good idea to see whether the booking process works as expected when using coupons.
Note that the specific options “Can only be used once per user” and “Can only be used on the first appointment” only work if you are logged in as a user (or acting on behalf of one).
When you are not using a coupon, the booking process should not be affected at all.
However, the process can be influenced if a valid coupon is used that provides a discount and a payment system is active.
The discount is applied to the total price and if there is no amount left to be paid, the booking is marked “Paid with coupon”, skipping checkout.
If the value of the coupon is higher than the amount due, the surplus gets lost.
The remainder of the process proceeds as normal: if the customer has any remaining credit, it gets applied and if there is no amount left to pay, the booking gets marked “Paid with credit”.
Finally, if there is an amount left to pay the user is forwarded to the checkout screen and the booking gets marked “Paid” once payment completes.
If you allow your customers to create repeating appointments be aware that a coupon is applied to each appointment in the series, even if it is marked as usable only “once”.
If that is not the desired effect, you should mark the coupon as “1 times” instead, to ensure it really can be applied to one specific appointment only.
On a repeating coupon the discount is applied to the total of all prices for each of the appointments.
On the Promotions screen, the “Used” column shows the number of separate reservations that were made using that coupon code.
For example, a single-use coupon applied to a booking that repeats 3 times would show ‘3’.
If a user is entitled to a permanent discount, the coupon discount takes precedence, even if the coupon has a lower or zero discount.
Once a user has created an appointment using a coupon code, they can no longer modify it, nor can they add a discount to an existing appointment.
If you allow your users to delete appointments they can still delete an entire appointment, at which point the coupon will be marked as “unused” again.
As a superuser or administrator you can modify the “coupon code” field at any time.
If you remove a code from a “Coupon code” field or delete an appointment, the corresponding coupon will be marked as “unused” again.
The exception to this is the automatic clean-up of appointments, which can be configured on the “Usage Information” screen; those deletions do not affect coupon usage statistics.
You need to make sure that people cannot delete past appointments, as this would allow them to re-use coupons.
You can do so by going to the configuration screen of your schedule, selecting the Process tab and making sure that the first option under the section How long in advance can a user add or change their reservation? is NOT set to zero.
A “0” means that clients could also change bookings in the past.