Use a custom domain with your schedule
This tutorial demonstrates how to create a custom web address (URL) for your schedule.
Creating a custom web address allows your users to access your schedule with a link such as www.your-company-schedule.com.
Links in confirmation emails will also use this domain. This helps reassure users that the schedule belongs to you.
The procedure of creating a custom domain name that points to supersaas.com is relatively straightforward. A complicating factor is that every domain registrar uses different software, so it’s hard to give step-by-step instructions. A second complication is that nowadays customers expect to have an SSL encrypted (HTTPS) connection on pages where they enter their information, and modern browsers show a warning message when a connection is not secure. Therefore, it is advisable to set up the domain so that it can be reached on HTTPS. Adding SSL encryption on a custom domain is a bit harder as it requires the use of a so-called “proxy”.
In this tutorial, we explain how you can add Cloudflare as a proxy to SuperSaaS so that your custom domain is SSL encrypted by using the following steps:
- Create a new domain or migrate an existing one
- Create a CloudFlare account
- Point a (sub)domain to SuperSaaS
- Link the domain to your account
- (Recommended) Force upgrade to SSL on Cloudflare
Step 1: Create a new domain or migrate an existing domain
Migrate the DNS of your existing domain to Cloudflare to create a subdomain like schedule.your-company.com or purchase a new domain for the purpose with a name like your-company-schedule.com.
Due to the risk involved in changing your DNS, some providers do not allow you to modify the DNS yourself.
If your provider does not allow DNS modification or if you are not comfortable modifying your DNS, your best option would be to buy a new domain for this purpose.
You can also buy a cheap domain for as little as a few dollars per year from domain name providers like NameCheap or Gandi.
SuperSaaS does not sell domain names.
Step 2: Create a Cloudflare account
Once you have access to the name servers of the domain that you want to use, you can create a free Cloudflare account. If you have an existing domain, then the setup tutorial at Cloudflare will help you with the migration.
Step 3: Point a (sub)domain to SuperSaaS
Once the domain is under the control of Cloudflare, go to the “DNS” menu item inside your Cloudflare account and click “Add record” to create a subdomain that will point to your schedule.
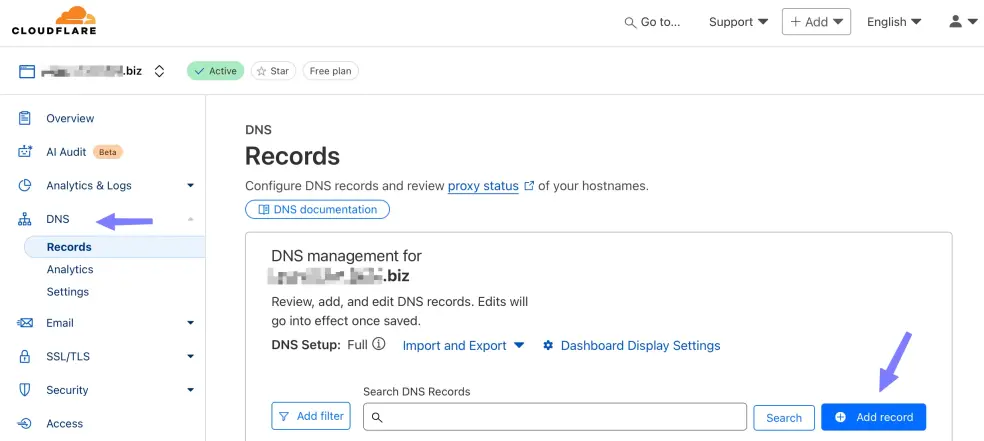
On your DNS control panel, add a ‘CNAME’ record to your DNS.
While creating a new CNAME, you need to enter and name and a target address that it should point towards.
The “Name” is the part that will be the subdomain of your site, a name like ‘schedule’ or ‘booking’ would be a good choice.
For example, if you have the domain yourcompany.com, then the complete domain name would be schedule.yourcompany.com.
The “Target” is the destination that it points to, it should be www.supersaas.com, see screenshot.

Do not put in the entire URL to your schedule. Just enter www.supersaas.com, not the /schedule/… part.
The SuperSaaS system can figure out the rest of the URL once you have linked your domain to your account (in the next step).
DNS changes propagate slowly and may take up to 24 hours before they take effect. When some time has passed, you can try accessing your new domain by typing it into a browser. If you followed the procedure correctly, you should be directed to the SuperSaaS homepage (but not yet your schedule). If you already entered your custom domain on your account (as explained in the next step), you would see a screen explaining that your domain still has to be linked to your account. Only after this works correctly should you continue with the next step.
Step 4: Link your domain to your account
You can now access your schedule by replacing the www.supersaas.com part in your schedule with your custom domain.
The next step is to link the domain to your account. Linking the domain to your account provides you with two additional benefits:
Firstly, the custom domain will be used in all outgoing email messages that mention a URL, such as reminders.
Secondly, if a visitor points their browser at the bare domain name, without the /schedule/… part, the system will redirect them to your account instead of to the SuperSaaS homepage.
To link your domain to your SuperSaaS account:
- On your Dashboard, select Layout Settings and scroll down to the Appearance section. Here you will find an Advanced Settings link.
- On the Advanced Settings page, you’ll find a section labeled Using Your Own (Sub)Domain where you can enter the (sub) domain name you set up earlier.
- When you check and click , the system will check if the URL does indeed resolve to SuperSaaS to ensure the links in reminder and confirmation emails sent are really correct. This check also helps ensure someone else cannot incorrectly link to your schedule.
You can have multiple schedules in one account, and they all use the same custom domain. The supervise screen of the individual schedules will tell you the URL to reach a particular schedule. If you have multiple schedules and someone enters just the domain part of your custom URL, they can either be shown a list of your schedules to choose from or be redirected to the first schedule on your dashboard. On the Access Control page under the heading What happens when you access… you can select whether your domain will show users a list of available schedules, or if it should just show the first schedule.
You can point multiple subdomains to the same account. For example, if you want both www.myschedule.com and myschedule.com to work, then enter only the myschedule.com part.
If instead you want schedule1.example.com and schedule2.example.com to point to two different accounts, enter the entire domain name.
The top-level domain controls the default language the visitor sees. So a domain ending in .de would show a German language schedule.
Anything for which the language cannot be determined, such as .com or .org will use the default language specified in Layout Settings.
You can force the page to a particular language by adding ?lang=xx to a URL, where xx is an ISO language code such as fr or en for French and English respectively.
Step 5: (recommended) Force upgrade to SSL on Cloudflare
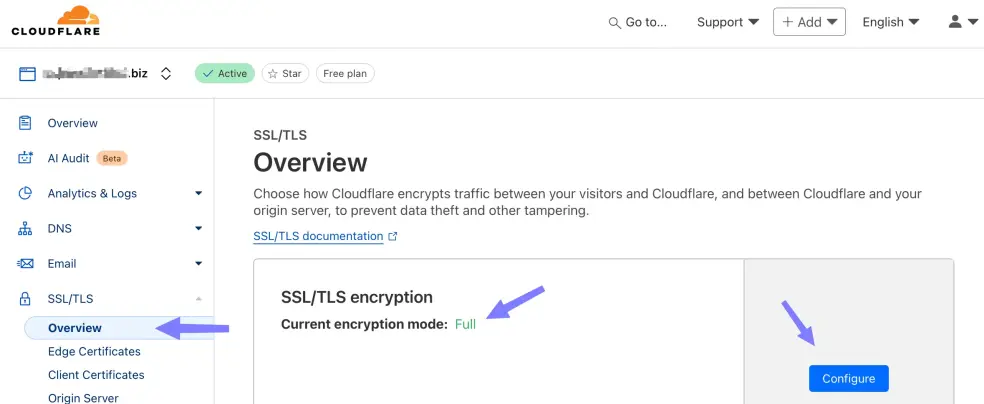
Our server upgrades HTTP connections to HTTPS on the login page and on payment pages. Regular HTTP connections would otherwise show an alarming warning in modern browsers, which we want to avoid. However, our server cannot accurately detect the situation where users are connected to Cloudflare via HTTPS, but connected to SuperSaaS on the second leg via http. In that case the user would be forwarded to a SuperSaaS HTTPS domain which we know to be safe. This is probably not what you want, as it would show supersaas.com in the browser bar, not your custom domain. To prevent this situation, make sure that Cloudflare encrypts the traffic to SuperSaaS. You can find the setting on in the SSL/TLS menu item under “Overview”. If the “Current encryption mode” is listed as “Full” then it’s switched on. If it’s not, then click the Configure button to set it up, see screenshot.
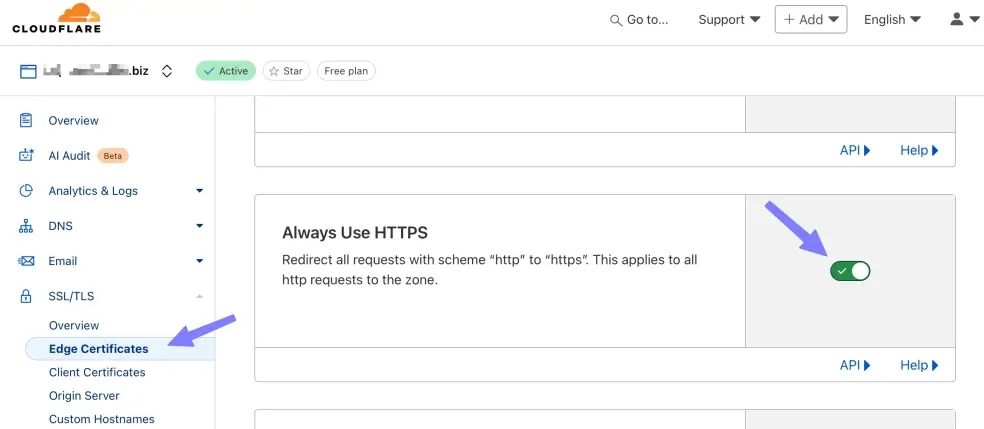
To ensure that users who accidentally land on an outdated HTTP link are automatically redirected to HTTPS, you can configure Cloudflare to redirect them automatically. On the tab “Edge Certificates” choose the option “Always use HTTPS”, see screenshot.
SuperSaaS offers a similar setting on its Access Control page, however, you typically would not want to use that one, because the only way for our server to enforce SSL/TLS is by redirecting your users to a SuperSaaS HTTPS domain, again ignoring your own custom domain.