Working with online payments
Use our integrated online payment system if your customers need to pay during the booking process. This page explains the SuperSaaS-side setup and how to test it. If you need the login credentials, API keys, or provider-specific connection details, continue to Configuring a payment provider.
- you want users to pay while making a booking
- you want to know which SuperSaaS settings to switch on
- you want to test the full checkout flow
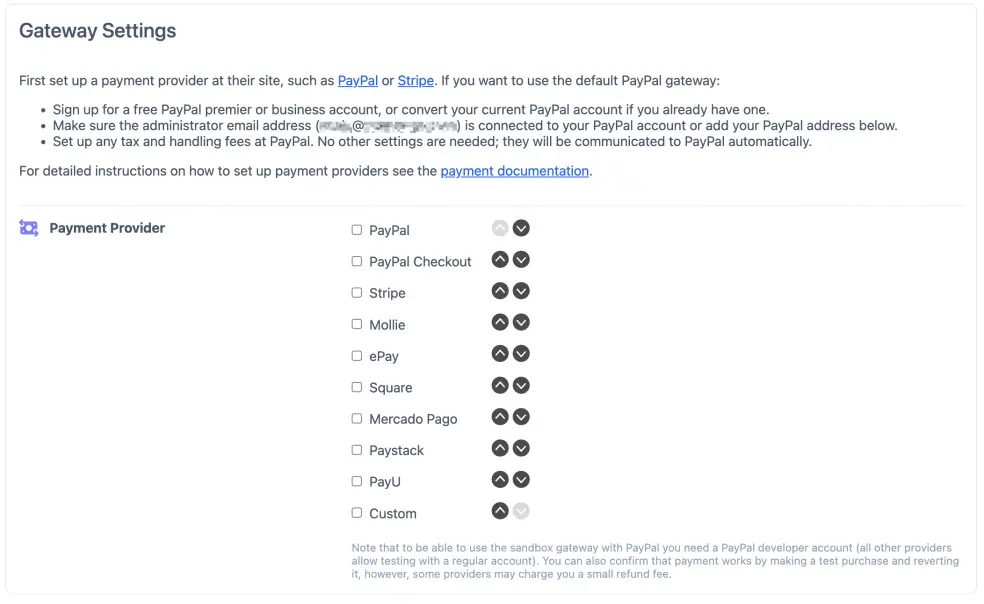
PayPal is the default payment provider. To use PayPal, you need to create a free PayPal account. Your clients do not need a PayPal account, they can pay by credit card. There are many other payment providers that you can use, such as Stripe, Square or several others.
The video below provides a visual overview of most of the information on this page.
Set up online payment process
In most cases, setup comes down to three parts: define a price, connect a payment provider, and then switch on the payment requirement for the schedule.
- Make sure you have already set a price for the booking. Without a price, the payment step cannot be shown.
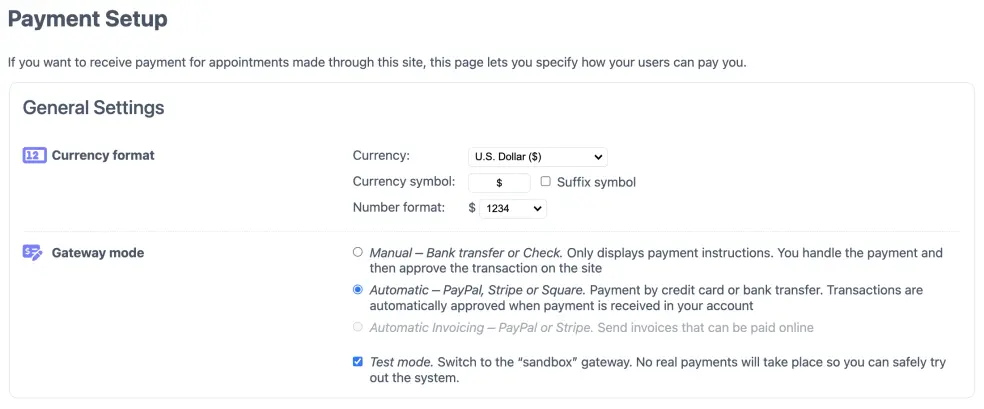
- Go to Payment Setup on the Dashboard.
- Under ‘General Settings’ select the gateway mode:
- Under ‘Gateway Settings’ select your payment provider and enter the credentials. Press . This will take you back to your Dashboard.
- For the schedule for which you want to enable payment, navigate to the Configure > Process tab, under Require payment or approval?, select and press .


If you are using PayPal, the provider-side setup is described on Setting up a PayPal account.
What happens after a customer pays
When a client makes a booking, it is added to your schedule right away so nobody else can take the same spot. The booking is marked as ‘pending’ until the payment is received. Once the payment provider confirms payment, the booking is confirmed. Email confirmations are also sent to you and the client if you have set those up. If the payment fails, the pending booking is removed from your schedule after 15 minutes. The booking will be reinstated if the payment is received later. When someone else has taken the spot in the meantime, the administrator will receive a notification.
Testing online payments
There are two ways to test your online payment setup:
- Use the button on the Payment screen. It simulates the payment process without using a third-party provider. It is available when you switch on Test Mode. To do this, go to the Payment Setup page and check the option
- Make a booking on the live system and directly reverse it. This lets you verify the full real-world flow. PayPal charges you a fee for the refund (typically around $0.30). See more instructions below.
Testing on the live system
To test your online payment setup on the live system, log in as a user and make a booking that requires payment. If you don’t see a payment page during the booking process, here are a few things that could cause the problem:
- You have set a price below $1.00 (the minimum amount allowed for automatic payments)
- You are logged in as superuser or administrator and have selected the option on the Configure > Process tab
- You have enabled the credit system and the user you logged in as has credit left. (Note: the administrator always has unlimited credit)
Clicking the button takes you to the PayPal site, where you can make the payment. Note that PayPal does not allow you to send money to yourself, so you need to use another credit card – different from the one that is associated with your PayPal account – or another PayPal account – different from the one that is associated with your SuperSaaS schedule – to make the payment. After completing the payment, you are returned to your schedule. Once PayPal notifies SuperSaaS that payment was received, the booking’s status is updated and confirmation emails are sent.
To reverse the payment, log in to your PayPal account. On the Home tab, scroll down to the Recent activity section. Locate the payment you just made, then click on the name associated with it. This opens another page where you can click on the button, where you make the actual refund (The page where you have to confirm the actual refund also informs you about the refund fee you’ll be charged).
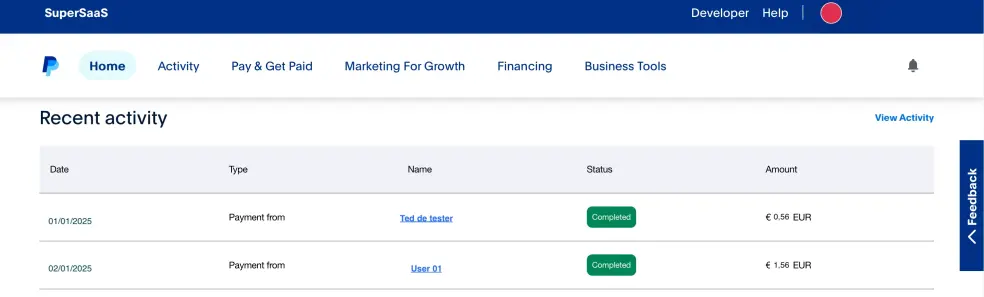
A few minutes after you refund the payment through PayPal, the booking is deleted from your schedule. Find out what happened to a booking by going to the Supervise page. The Show Trash option shows deleted items. In a Capacity schedule you first need to “zoom in” on a class with the icon to see the link to the trash. The payment indicators will explain whether a booking was deleted because of a refund – – or any other reason.