Configuring a payment provider
SuperSaaS supports several payment providers to handle payments for appointments and for purchases in the credit shop. By default, PayPal will be used as the payment provider. If the default PayPal setup is good enough for you, you may not need most of this page.
You can add one or more additional payment gateways and optionally remove PayPal as a provider with the instructions below. Configuration can be done using the payment gateways form.
- Set prices
- Switch on online payments
- Use the instructions below to connect the provider you want
- Changing the PayPal gateway (default)
- Add PayPal Checkout as payment gateway
- Add Stripe as payment gateway
- Add Mollie as payment gateway
- Add Square as payment gateway
- Add ePay as payment gateway
- Add PayU as payment gateway
- Add Paystack as payment gateway
- Add Mercado Pago as payment gateway
- Add a custom payment gateway
Changing the default PayPal Standard gateway
The “PayPal Payments Standard” gateway is enabled by default. This is the easiest way to get started with payments. PayPal also offers a more modern payment gateway called “PayPal Checkout” which offers additional payment methods. For PayPal Payment Standard, the system will assume the administrator’s email address is linked to a PayPal account. You can use a different PayPal account by updating the email address shown in the PayPal email field.
Note that in some regions “PayPal payment Standard” requires that end-users create a PayPal account before they can pay you. You may want to consider “PayPal Checkout”, or one of the other options on this page if that applies to your region.
If you intend to use a different gateway you can switch off the default PayPal gateway. You do this by unchecking the relevant checkbox on the Payment Setup page.
Add PayPal Checkout as payment gateway
PayPal Checkout is the latest payment gateway from PayPal. It requires a few more steps to get it working, but it offers more ways for your users to pay you compared to PayPal Payment Standard, including PayPal Buy Now Pay Later (BNPL). If PayPal Checkout is not yet visible on the Payment Setup page, you can enable it with this link: enable PayPal Checkout.
Copy credentials from PayPal to SuperSaaS
- Navigate to the “PayPal Developer” section.
- Click on “Log into Dashboard” and log in with your PayPal account.
- Click on “Apps & Credentials” on the top menu.
- If you don’t have an app click on “Create App” and give it a name, for example “SuperSaaS” or the name of your organization.
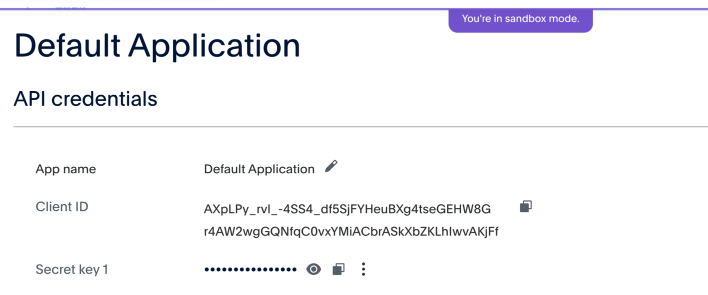
- Below “REST API apps” column, under App name click on your app, which could be the Default Application.
- Have your Payment Settings page available on the SuperSaaS website.
- Note that on the PayPal website you only need to copy the “Live” mode credentials unless you are doing testing then copy also “Sandbox” credentials.
- You can toggle between the Live and Sandbox mode by using the switch button top right corner.
- Copy the “Client ID” as well as the “Secret key” and paste them into the corresponding fields in the Payment Settings section of your SuperSaaS account.
- If there is no Secret key, you can generate one by pressing “+ Add key” button.
- Make sure that you have at least copied credentials from the “Live” mode.
By default, PayPal asks users to provide a contact phone number during payment, you can switch this off in your PayPal account on the page Website payment preferences, scroll down to the “Contact telephone number” section.
Set up a webhook from PayPal to SuperSaaS (optional)
To make sure that the system is notified of successful, declined or refunded payments, you can set up a webhook. The webhook will make sure that PayPal’s servers contact us, even if, for example, the browser window is closed prematurely or a payment is reversed later on.
- If you followed the instructions in the previous section on how to get PayPal Checkout credentials, you should be in your application menu.
- If not follow the previous section and in the (Default) Application menu scroll past API Credentials and Features all the way down to Webhooks.
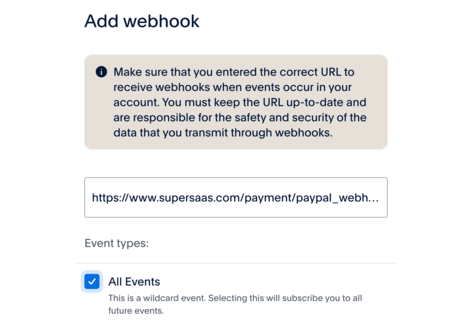
- Click on the Add Webhook button, and in the box enter
https://www.supersaas.com/payment/paypal_webhook - Caution! Choosing “Event types” is important, and if unsure just check “All Events” (image above).
- This option will send a lot of event messages to SuperSaaS that we do not process, so preferably you should uncheck “All Events”.
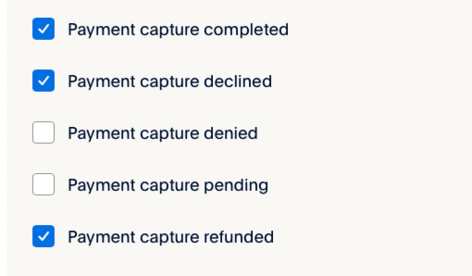
- Scroll down the list and expand a sub list of events by clicking the down arrow next to “Payments & Payouts” (see image below).
- There are three events you want to check: “Payment capture completed”, “Payment capture declined” and finally “Payment capture refunded”.
- Then scroll down to the bottom of the list and click “Save”.
- Now if you have added the credentials to SuperSaaS Payment Settings and created the webhook you are done.
Add Stripe as payment gateway
You can find comprehensive information about Stripe on their support page.
Stripe currently supports payments in more than 100 currencies and dozens of payment methods. For a number of popular payment methods, such as credit card and Google Pay, we offer a direct Stripe integration on the checkout page. If the payment method you wish to offer is not listed on the Payment Setup screen, then you can select . The Stripe-hosted checkout page shows all payment methods available in your Stripe account. Your customer will be charged in the currency that you configure at the top of the Payment Setup screen.
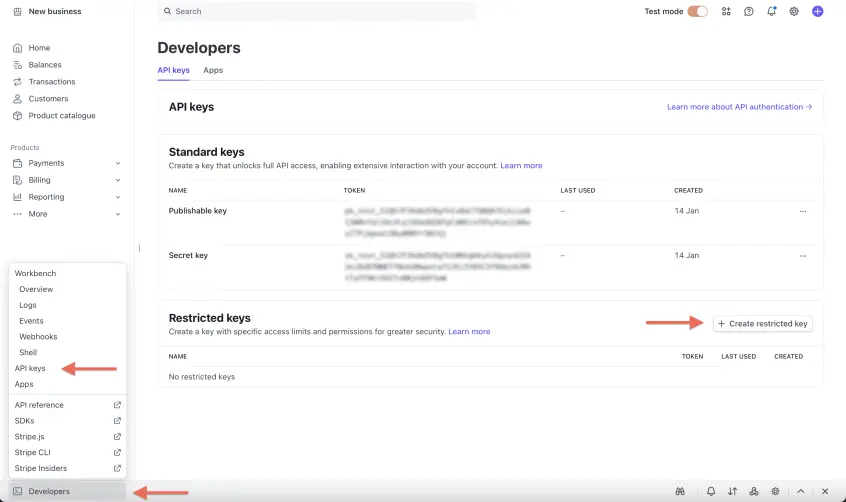
To start using Stripe with your SuperSaaS account, navigate to the “API keys” section in your Stripe account to find the required keys:
- Create a new “Restricted key”. Select the option “Building your own integration”.
- On the next screen give the key a name and select “write” permission on the “PaymentIntents” and the “Checkout Sessions” resource, then press “Create key”
- You may also want to create Test API keys to be able to test the integration. Test keys are used for simulating payments without an actual money transfer, while the live keys are used for charging your customers. You can do that by switching on “Test mode” and repeating the previous steps to get a “Restricted” and a “Publishable” test key. The “Test mode” setting can be found by clicking your account name on the top left of your Stripe dashboard, under the “Switch to sandbox” menu.
- Add these four keys to your SuperSaaS account on the Payment Setup screen by selecting the Stripe checkbox and populating the fields.
Set up a webhook from Stripe to SuperSaaS
If a user closes their browser window shortly after completing the payment, there is a chance that the browser will not have had a chance to notify our server yet. This is most likely to happen with payment methods that redirect users to the website of their bank, such as some 3DS confirmations, and iDEAL | Wero payments. The user will have been charged, but the appointment will not be marked as paid. For this reason, we recommend that you set up this webhook, which will make sure that Stripe’s servers contact us, even if the browser window is closed prematurely.
- Navigate to the “Webhooks” section on the Stripe dashboard and click ‘Add destination’
- Under the heading ‘Events’ select the following events: Payment Intent →
payment_intent.canceled, payment_intent.payment_failed, payment_intent.succeeded - Optionally add the Charge →
charge.refundedevent, so the system can automatically cancel appointments if a payment is refunded - Click “Continue”, select “Webhook endpoint” and click “Continue” once more
- In the box ‘Endpoint URL’ enter
https://www.supersaas.com/payment/stripe_webhook - Click ‘Create destination’ to save the webhook details
- Stripe stores the webhook separately for “live mode” and for “test mode”, you only need to add it for “live mode”
You can try out Stripe by switching to ‘Test Mode’ on the Payment Setup Screen in the Payment Settings section of your SuperSaaS account. Be aware that while ‘Test Mode’ is switched on, anyone will be able to create appointments on your SuperSaaS schedule without paying. After making the first successful test payment, you can consult your Stripe Dashboard in ‘Test Mode’. If the payment is listed in the ‘Payments’ section, you can switch the ‘Test Mode’ off and start using Stripe in ‘Live Mode’.
Credit card and / or other payment methods
By default, only the option for credit card payment is enabled. If you want to use the other payment options, you can do so by selecting the appropriate checkboxes. Also make sure to enable the desired payment methods inside your Stripe account. If the payment method you need is not listed, you can select to show all available payment methods on a page hosted by Stripe. Some payment methods, like Apple Pay, only work on a page hosted by Stripe.
Taxes on payments and invoices
If you set up taxes then this information will be sent to Stripe as metadata. Invoices also receive tax information to be displayed.
Secret key
Instead of a “Restricted” Stripe key you may provide a “Secret” key. However, this option is less secure than using a “Restricted” key, as that key gives full access to your Stripe account.
Add Mollie as payment gateway
![]()
![]() Mollie is a European-focused payment provider that can be used to collect payments through the European SOFORT payment system, the Dutch iDEAL | Wero system and the Belgian Bancontact system.
It also provides an option to use “Klarna Pay Later”, a service that allows your customers can pay afterwards.
If you have a Mollie account, you can connect it to your SuperSaaS account with API keys on the Payment Setup screen. You can find these keys in your Mollie account, under “Developers”, “API keys” with the names “Live and Test API keys”.
Mollie is a European-focused payment provider that can be used to collect payments through the European SOFORT payment system, the Dutch iDEAL | Wero system and the Belgian Bancontact system.
It also provides an option to use “Klarna Pay Later”, a service that allows your customers can pay afterwards.
If you have a Mollie account, you can connect it to your SuperSaaS account with API keys on the Payment Setup screen. You can find these keys in your Mollie account, under “Developers”, “API keys” with the names “Live and Test API keys”.
Mollie does not allow their payment screen to operate inside an iframe. Therefore, when you enter the checkout page our system will detect if the page is inside an iframe. If that happens to be the case then it will escape from the frame to ensure a subsequent click on the Mollie button will work.
If you have set up taxes in your pricing rules then that information is forwarded to Mollie to be displayed in the receipts. When using the credit shop in combination with Mollie, please be aware that the way Mollie calculates tax can result in a small difference with the amount shown in SuperSaaS. Specifically, Mollie uses the VAT rate as a percentage to verify that the correct tax amount is applied. In some cases, even a slight difference of a few cents in the total tax sum can correspond to the same VAT percentage. We use an algorithm that calculates the higher tax amount to meet Mollie’s verification requirements. As a result, the tax sum in SuperSaaS may differ by a few cents from the amount you initially set in your shop dashboard. You would want to perform test transaction to verify the amounts match up between SuperSaaS and Mollie. If there is a difference between the tax amounts in Mollie and SuperSaaS, update the tax sum in your SuperSaaS webshop to match the amount displayed on the Mollie dashboard. The requirement to match the tax amounts is mandated by Mollie, they may decline processing if the amounts do not match up.
Add Square as a payment gateway
You can find comprehensive information about Square on their support page.
Square is a payment provider focused on credit card payments in US, Canada, Japan, Australia, and the United Kingdom.
Setup
Get API keys
To set up Square in SuperSaaS on the Payment Setup screen you will need 6 keys: an “Application ID”, “Personal Access Token” and “Location ID” for live payments, and an “Application ID”, “Personal Access Token” and “Location ID” for test/sandbox payments. You can find these keys as follows:
- Login to the Square developer dashboard
- Click the plus sign to create a new application, and give it a recognizable name. (e.g. “SuperSaaS”)
- Click “Open” on the application you just created. It will now show you the “Sandbox Application ID” and the “Sandbox Access token”.
- To find the two production keys you need to flip the switch at the top of the page to “Production Settings”.
- To find the Location ID click “Locations” in the left-hand menu, this will give you the Location ID for the Sandbox
- Flip the switch at the top of the page to find the Location ID for the Production environment
Add the keys to SuperSaaS
Add all 6 keys to your SuperSaaS account by selecting Square checkbox and filling in the form.
If you have set up taxes, then this information will be sent to Square and is visible in the note field of the payment.
Test mode
You can try out Square by switching to ‘Test Mode’ on the Payment Setup Screen in the Payment Settings section of your SuperSaaS account. Be aware that turning ‘Test Mode’ on will switch all your currently configured payment providers to ‘Test Mode’. After making the first successful test payment, you can check the dashboard of the Square ‘Default Test Account’ to see if the payment went through. You can find the ‘Default Test Account’ on the Square Developer Dashboard. If the payment is listed in the ‘Transaction’ section, you can switch the ‘Test Mode’ off and start using Square in ‘Production Mode’.
Add ePay as payment gateway
There is also a Danish version of this guide
ePay, formerly Bambora, is a Danish payment provider which supports a variety of payment methods, including Dankort. If you have an ePay account you can enable the ePay gateway by selecting the ePay checkbox and filling in the fields.
Furthermore, you will need to add the domain of your schedule in the ePay administrator setup. If the domain is not registered, you will get an error message. You can find this setting here: “Settings” → “Payment system” → “Domains created for relay-script”.
Unless you are using SuperSaaS with a custom domain, you can simply enter “supersaas.dk” here. If you are using a custom domain you need to enter your custom domain here. Furthermore, if you configure that the user will be redirected after a successful booking, the domain of that page needs to be in ePay’s system too. To add more than one domain you will need to contact ePay support. However, their system does accept requests from subdomains of the registered domain. So, when using a custom domain, a solution is to register the top level of your own domain with ePay and use a subdomain for your SuperSaaS schedule.
Enable the MD5 secret key
It is recommended that you enable an MD5 hash check on your account with a secret key. If there is no secret key present a hacker could spoof payment messages, causing appointments to be listed as paid when in reality no payment took place.
If the secret keys do not match exactly the system will move appointments to the trash, marking them with the message “Fraud check failed”, even if payment was successful.
Credit shop limitations for ePay
If you are using the credit shop, you will need to switch the setting “Unique orderID” to “Not using Unique orderID” on the “Settings for the payment system” page. Otherwise, you would only be able to sell each product once, because the product ID is used as the order ID. When paying for appointments the order ID is a unique reservation number, so it’s fine to enable the setting in that case. Note that the feature to allow the customer to enter their own quantity is not available when using ePay.
Advanced ePay settings
If you use the same ePay account for multiple purposes you might like to create a separate “window”, which can have its own customization such as the logo.
If you switch on “instant capture” the payment will automatically be captured right after the authorization step.
Note that MD5 must be enabled to be able to set the window ID, and the window ID must be present to enable instant capture. If you do not know what a window ID is, you can simply use the number 1.
At the moment ePay does not support taxes in the webshop.
Add PayU as payment gateway
PayU is a payment provider for Poland and the Czech Republic. If you have a PayU account you can enable the gateway by selecting PayU checkbox and filling in the details:
You populate your POS ID which was provided to you by PayU when you signed up. Fill-in the second key field with the actual second key from your PayU account. Finally, you need to enter the three-letter currency code for the currency that you are using in PayU. Ensure that the currency configured on the Payment Setup screen in SuperSaaS is the same currency as in your PayU account.
Note that specifying a quantity is not supported for PayU payments in the webshop. You can, of course, ask users to make multiple purchases for the same effect.
Test mode
In order to test the PayU without making actual payments, you can provide an extra POS ID, “second_key” and currency of a PayU sandbox account. (Learn more about PayU sandbox accounts). Then, on the Payment Setup Screen under the Gateway Settings section, turn on ‘Test Mode’.
Be aware that turning on ‘Test Mode’ will switch all your currently configured payment providers to ‘Test Mode’. Once you have made a successful transaction with PayU in test mode, you should be able to find the transaction in your PayU Sandbox account, under “Online Payments” → “Transactions” → “List of transactions”. If everything is working correctly you can turn off the Test mode in SuperSaaS.
If you have set up taxes, then this information will be sent in the additional description field.
Add Paystack as payment gateway
Paystack is a payment provider operating in Africa. If you have a Paystack account you can enable the gateway.
You will need to place your Live Secret Key which you can find in the Settings area inside your Paystack dashboard. Ensure that the currency configured on the Payment Setup screen in SuperSaaS is the same currency as in your Paystack account.
Set up a webhook from Paystack to SuperSaaS (recommended)
If a user closes their browser window quickly after completing the payment, there is a chance that the browser will not have had a chance to notify our server yet. This is most likely to happen with payment methods that use the 3‑D Secure process where customer can be redirected to a page to confirm their identity. To address this, it’s recommended to set up a webhook, which will make sure that Paystack’s servers contact us, even if the browser window is closed prematurely.
- Navigate to the “Webhooks” section on the Paystack dashboard.
- This can be found by going to the Settings and there selecting the API Keys & Webhooks tab.
- In the box ‘Webhook URL’ enter
https://www.supersaas.com/payment/paystack_webhook - Next click the ‘Save changes’ button and you are done.
- Note that Paystack stores the webhook separately for “live mode” and for “test mode”, you only need to add it for “live mode”.
Test mode
In order to test the Paystack gateway without making actual payments, you can provide an extra Test Secret Key. (Learn more about Paystack Sandbox and Live keys). Then, on the Payment Setup Screen under the Gateway Settings section, turn on ‘Test Mode’.
Be aware that turning on ‘Test Mode’ will switch all your currently configured payment providers to ‘Test Mode’. Once you have made a successful transaction with Paystack in test mode, you should be able to find the transaction in your Paystack Sandbox account, under “Transactions”. If everything is working correctly you can turn off the Test mode in SuperSaaS.
If you have added taxes then this information is sent along with regular payments as metadata visible in the dashboard as well as included in invoices.
Add Mercado Pago as payment gateway
Mercado Pago is the financial services arm of Mercado Libre, which is one of the largest e-commerce ecosystems in Latin America. You need to have a registered business Mercado Pago account to continue, and keep in mind that the country specific sites might vary slightly.
- Go to the Mercado Pago website of the country you operate in and sign up for a business account if you don’t already have one.
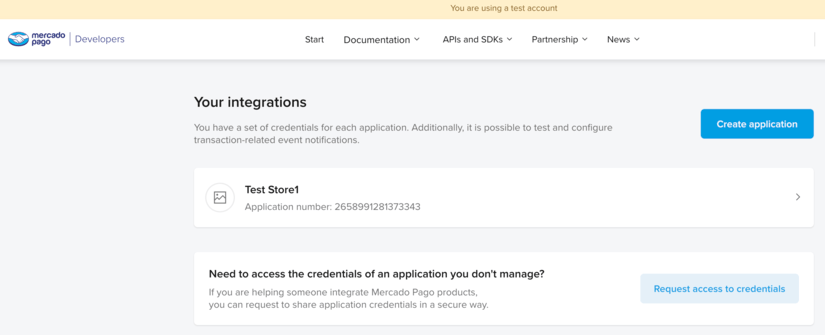
- Sign in to the Mercado Pago developer dashboard.
- Navigate to “Your Applications”: Look for a section related to API credentials or applications.
- Create a New Application: Register your application or website by providing the necessary details like name, description, and the URL.
- You do not need to use an e-commerce platform nor in person payments so answer No.
- Once you have created an application then next step is to get production credentials working.
- Before Mercado Pago grants you production access, they require that you complete a checklist
- Just fill in the details, and you can accept that the integration has been tested by SuperSaaS (see below for payment testing).
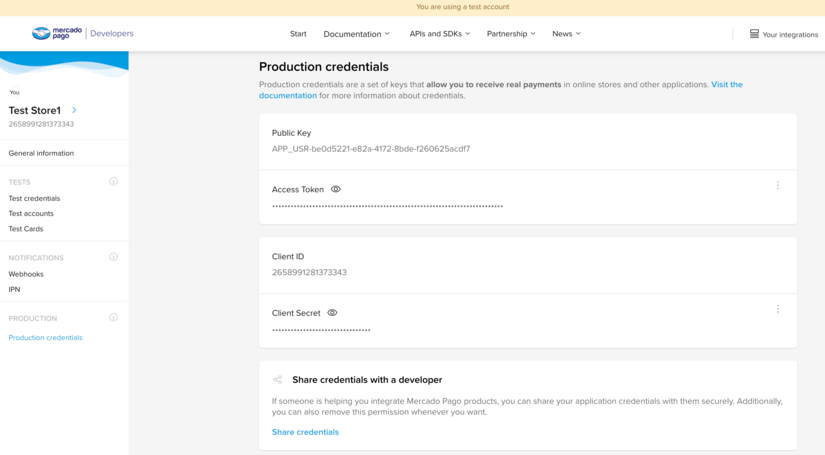
- Once your application is registered, and you’ve completed any necessary checks or agreements, you will be able to access your production credentials.
- You will need to open your application dashboard, scroll down to production credentials.
- Copy the “Public Key” as well as the “Access Token” and paste them into the corresponding fields in the Payment Settings section of your SuperSaaS account.
- Tax information for Mercado Pago is visible in the metadata field.
Testing payments
Testing that the integration works requires you to copy test “Public Key” as well as the test “Access Token” to the correct fields in the Payment Settings.
- After copying the test credentials make sure that test mode is enabled for payments.
- To test that payments work you can use Mercado Pago test cards
- After testing with the test cards, you should also test the production credentials by switching to live mode in SuperSaaS Payment Settings and using a real credit card.
- Make sure that you are not signed in, and do not sign in during the payment flow, with the Mercado Pago account that is receiving the payments.
Add a custom payment gateway
If you need to integrate with another provider not listed here, or if you want to use your own payment backend, then it’s possible to add your own gateway. Note that this requires considerable technical proficiency.
You can find the details in the developer documentation about the custom payment gateway.