Integrate a Joomla! site with SuperSaaS
This page explains how to integrate a SuperSaaS schedule into a Joomla! based website so that your users only need to sign in once to access both your website and the SuperSaaS schedule within it. To be able to use it you first need to sign up for a (free) SuperSaaS account.
- Use Joomla! login names for SuperSaaS
- Install and set up the plugin in Joomla!
- Change settings in SuperSaaS to connect with Joomla!
- Add booking button to your pages
- Tips for troubleshooting
Using Joomla! login names for your SuperSaaS schedule
The SuperSaaS Joomla! plugin displays a button that automatically logs the user into a SuperSaaS schedule using their Joomla! username.
The button generated by the plugin passes the Joomla! user database information along to SuperSaaS, creating the user in the SuperSaaS database or updating their information as needed. This saves users from having to create a separate login for the booking system and avoids the need to log in twice.
Installation and setup of the plugin in Joomla!
Follow these steps to set up the module in Joomla!:
-
Install the plugin. On the Joomla! administrator page go to System>Install: Extensions. You can install the plugin without downloading it separately:
- For Joomla! 6+, choose the option Install from Web and search for “SuperSaaS”
- For compatibility with older Joomla! versions download a release from the GitHub releases page.
-
Set up the plugin. In the System>Manage: Plugins screen search for the SuperSaaS and enable it by changing its status to “Enabled”.
Now proceed to configure the plugin, by clicking on it. Make sure that “Public” is selected in the “Access” settings on the right.
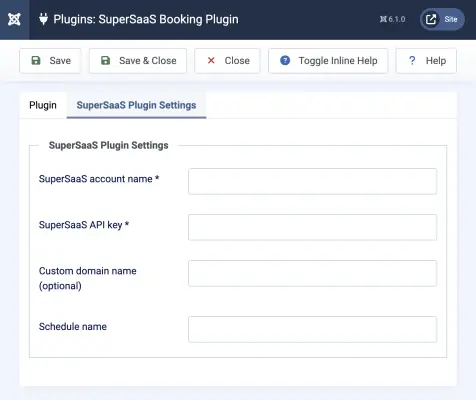
Next fill out the SuperSaaS Plugin Settings section:
- SuperSaaS account name* – This is name of your account (not your email address!)
- SuperSaaS API key * – You can find the API key of your SuperSaaS account at the bottom of the Account Info page.
- Custom Domain Name – If you created a custom domain name to point to your schedule, then you need to enter it here to correctly point your users to it
- Schedule name or URL – You can either put the name of a schedule or you can provide a full URL if you want to add specific parameters to direct the user to a specific view
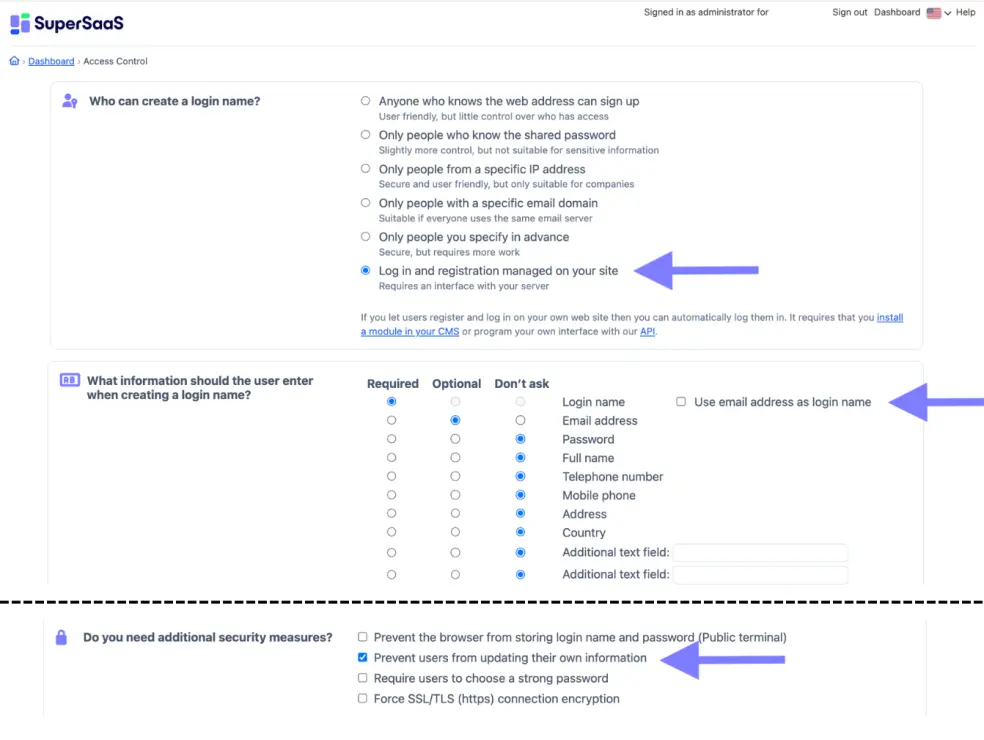
Change SuperSaaS account settings to work with Joomla!
Your Joomla! user database is the primary source, so any changes to user information on your Joomla! site will update in SuperSaaS, but not the other way around. Therefore, we recommend that you do not let your users change their user information on SuperSaaS because that could easily confuse them. For example, if a user were allowed to change their password on SuperSaaS they would probably not realize that their Joomla! password is still the same.
Make the following changes to your SuperSaaS account to avoid inconsistencies:
- On the Access Control page, select
- On the Access Control page, select
- On the Layout Settings page, fill out the box Your URL with the URL of the page on your site where users can log in
Next, you need to ensure that the database fields in Joomla! match those in your SuperSaaS user database. Make the following changes on the Access Control page:
- Deselect
- Switch the Email address radio button that appears to Optional (or Required)
- Switch all other fields to Don’t Ask (you can switch off the Password field too if you have selected )
Configure SuperSaaS
This image depicts the Access Control page in your SuperSaaS account after making the settings described above.Add the button to your pages
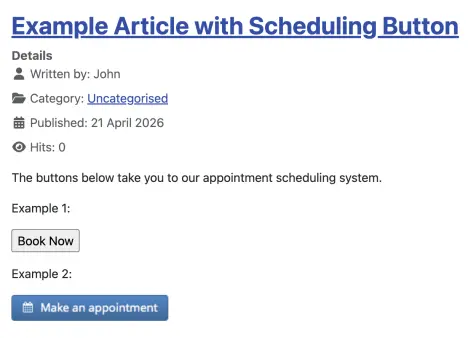
Place the short code [supersaas] on your pages everywhere you want the button to appear.
The short code can take the optional parameters after, label and image to overwrite the values on the settings screen.
This is useful if you want to add multiple buttons to different schedules, for example:
[supersaas after="schedule1" label="Book on Schedule 1"][supersaas after="schedule2" label="Book on Schedule 2" image="https://example.com/book_now.gif"]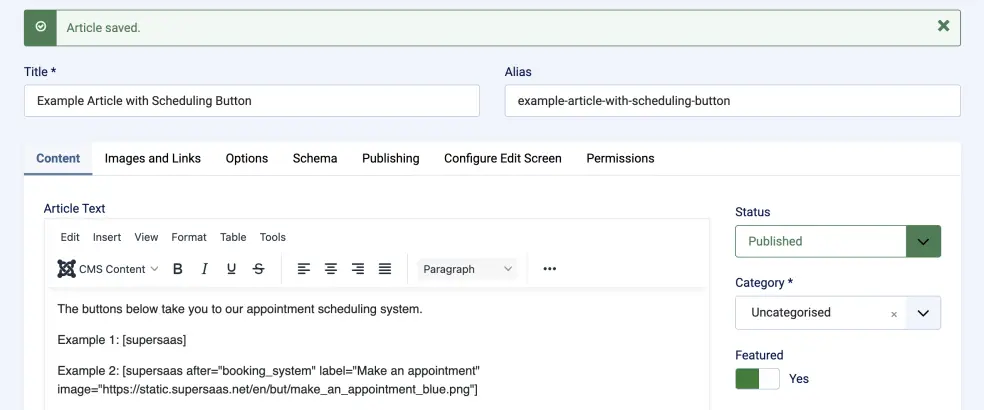
Trying it out
You can now try out the button on your site. As the administrator, you will still need to log in through the main SuperSaaS login page so you would want to try this out pretending to be a regular user. If you want to define superusers in SuperSaaS, make sure they have logged in at least once using the button before changing their role on the User Management page.
Troubleshooting tips
- Note that the button only appears to users who are logged in to your Joomla! site
- If you see an error “Email is not a valid email address”, then please read the “Change SuperSaaS account settings to work with Joomla” section again to confirm you have made the correct settings in your SuperSaaS account
- If you see an error “Login name is a reserved word”, then your username is a reserved word in SuperSaaS. Try logging in with a different username.
- If the button redirects the user but does not appear to actually log him in, and you have used a URL in the field Schedule name or URL then make sure that the domain of that URL is entered in the Custom Domain Name field.