In this tutorial we set up an online appointment schedule for a guesthouse. With small modifications this could also be used for a holiday home or a Bed & Breakfast.
Making a reservation
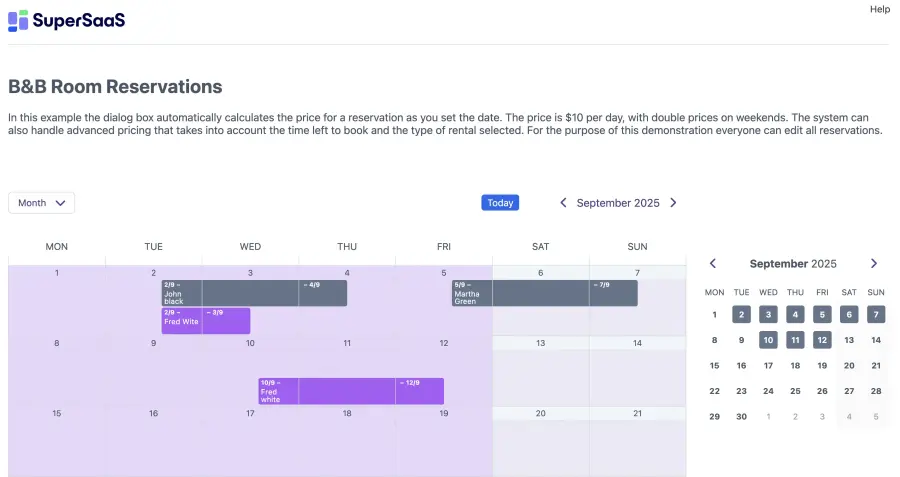
We refer to this calendar type as a Resource schedule: When you book a place in a guesthouse you use up a resource. If your guesthouse has multiple rooms you rent out individually, or if you want to put multiple guesthouses in a single schedule, you would define multiple resources.
In this example, an online booking system is created for a small guesthouse that offers a few rooms and requires guests to book amenities, such as towel sets.
This tutorial demonstrates the following customizations:
- using the online booking system as a simple accommodation booking tool
- sending customized email confirmations and reminders
- setting prices based on season and time left to book
You can view the end result on the holiday home demo. It’s possible to modify that page to make it appear as part of your site, but you can also integrate a SuperSaaS schedule as a so-called “widget”. A widget can appear as a small frame on your site, or as a small button, like the one below. With a widget, users can view availability and create a booking, but to change or cancel a booking later they will need to use the full schedule link, for example from their confirmation email.
Setting up the schedule in 6 easy steps
The easiest way to set up an appointment schedule is by using a build-and-test cycle: After the initial configuration you try it out, make changes, and repeat, until it works the way you want.
Step Setting up a basic schedule using the New Schedule Wizard
Step Trying out the schedule to see if it works as expected
Regular users will see the same schedule but with fewer options. You can also find Use by going to your Dashboard.

When you enter your online booking system for the first time you will be greeted by an empty schedule. SuperSaaS is incredibly flexible and can be set up to meet detailed requirements via the tabs under Configure.
Create a booking
Click anywhere in the schedule and a New reservation dialog window will appear. If this window is in an inconvenient place you can simply drag it to a more suitable place on your screen.
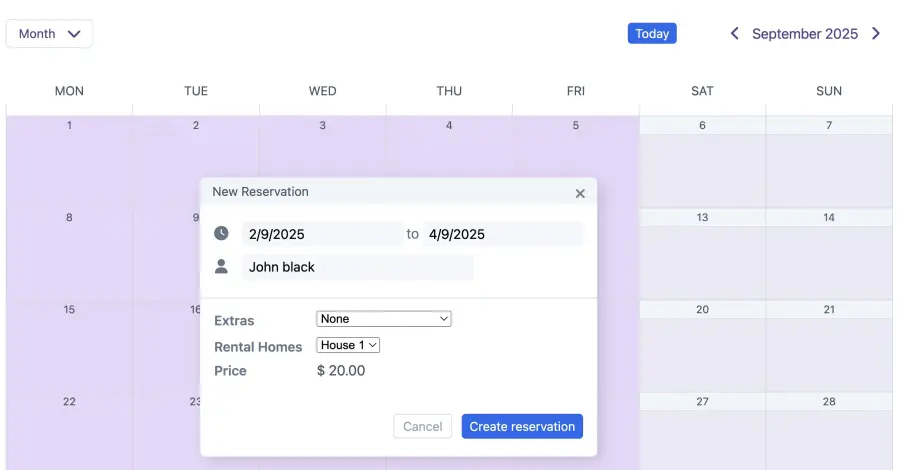
Instead of navigating to the correct date in the main calendar, you can click on When to change it. By default, the system only asks for a name and a phone number but you can add additional fields or custom forms to collect more booking details. The New reservation window will show a drop-down menu from which you can select Room 1 or Room 2.
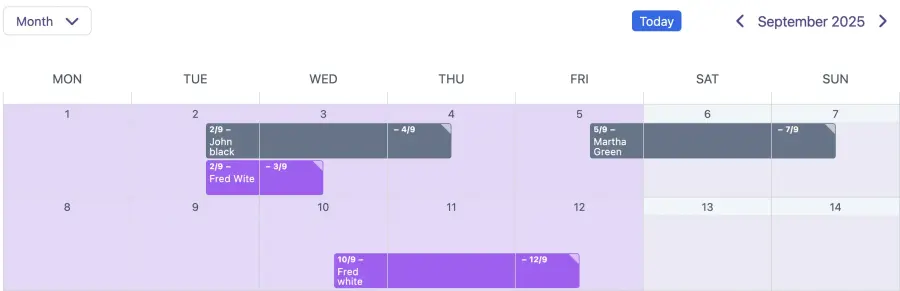
Click Create reservation and the schedule updates to show the space in the schedule as occupied. If you would like to edit the booking, click on it to re-open the window and make changes. Be sure to click Update to save your changes.
Step Adjusting the configuration
Set up the resources
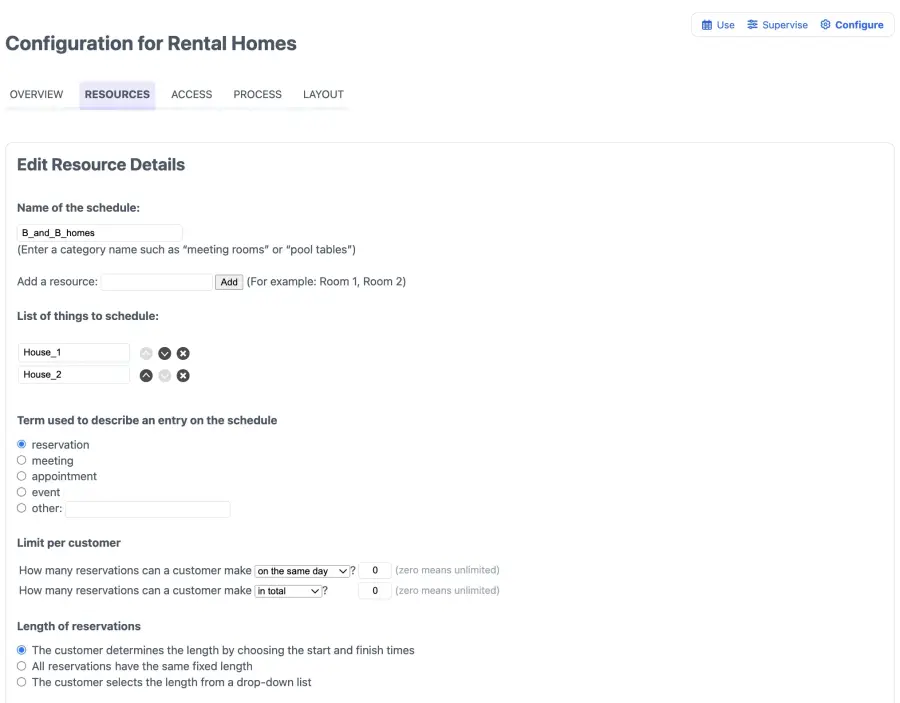
The Resources tab contains the settings that define the resource(s), or “rooms” in this case, that you are scheduling for your online booking system. In the first section, you can add or delete resources. You could, for instance, add another room to the schedule. Please note that if you delete a resource, all appointments made for that resource will be deleted.
Customize terms
Under Term used to describe an entry you can select a term from the list or use a custom term to refer to bookings. For a guesthouse, the term “reservation” is more suitable. This term will be used in all dialog boxes, help text and email confirmations.
The term used to refer to a “user” can also be customized, but this setting can be found on the account wide Layout Settings page.
Define user limits
You can limit the number of bookings that a guest can make by setting the “Limit per user”. When this maximum is reached guests can only change or delete existing bookings. You can select whether previous bookings should be included in the total or whether it should only include upcoming bookings. You can also specify a separate limit for the number of bookings that can take place on the same day or in the same week.
Determine booking length
For a schedule that can be booked for whole days, your guests will want to choose how many days they would like to book.
The next 3 options determine booking length in your online booking system:
- The client determines the length by choosing start and finish time. You can provide minimum and maximum durations to limit their choices.
- All reservations have the same fixed length. Simply specify this length as a default value.
- The client selects the length from a drop-down list. When you choose this option, a selection box appears where you can list the options. The accompanying instructions and help text explain how to specify the options.
Determine price
SuperSaaS offers a broad array of payment options for your online booking system. This includes presenting prices, handling online payments via PayPal or Stripe or offering a credit system.
In addition to these payment options, you can offer various types of discounts and promotional offers. Whether you require payment at all can be configured under Process. The payment method can be configured on the Payment Setup page. More information can be found under Adding payment to your schedule.
Under Price, you can specify what you will charge your guests on your online booking system. You can choose a fixed price or base the price on the length of the booking, the day of the week or several other factors.

If you charge a daily rate for the accommodation, select Depends on date, length or resource. You can click Set up pricing to define daily and seasonal rates. For example, to raise the price by $50 in June, you would define a pricing rule that says: “Perform action: Increase price by $50” if the date is “between 6/1 and 6/30”.
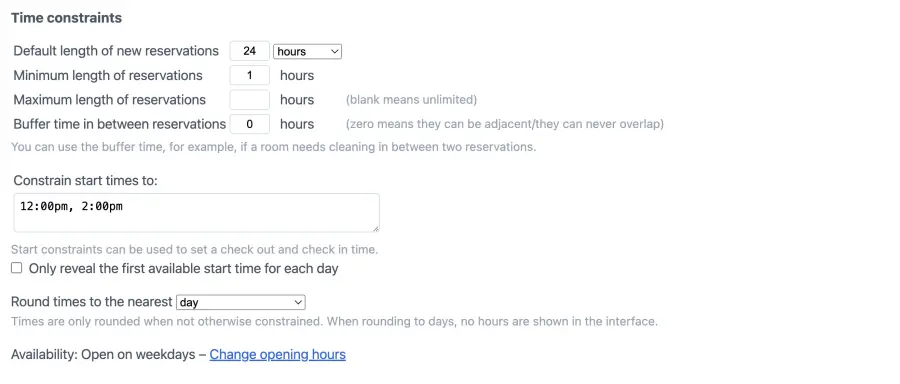
Constrain times
Under Time constraints, you can specify length requirements, buffer time and start times for your online booking system. You may want guests to book whole days, instead of hours and minutes, which is the default. When you select Round times to the nearest… day the user interface will omit the display of hours and minutes. This is typically a good setting to use for a guesthouse, where people rent for days, rather than hours.
You may also want to set the minimum length of a reservation to 1 day. By default, the system treats whole days as the 24 hours running from midnight. A one-day appointment will have its beginning and end date on the same day.
If you set a buffer time to anything other than 0, the system will ensure that there is some unavailable time in between bookings. This time could for instance be used for cleaning in between bookings. The buffer time is not applied between opening time and the first booking or following the last booking, before closing time.
In the Constrain start times field, you can list the times that your clients can select as a start time. If you specify start time constraints as well as rounding times only the finish time will be rounded. In this example, enter “12:00pm” and “2:00pm” as the start time constraints.
Step Building on the basic schedule
Step Testing the schedule from a visitor’s point of view
Every appointment schedule has its own URL, which can be viewed via Configure under Overview. Importantly, the schedule looks a bit different to you than it does to your users.
Your users will not see the Supervise and Configure buttons, and will typically not be able to see and change the appointments of other users. To view the schedule from your user’s point of view log out as administrator with the link in the top right menu, and then go back to the schedule page. You can speed up this process by using a second browser, or by using an anonymous browsing tab, the section “Testing the schedule you created” discusses this in detail.