Add custom forms
Forms can be a good way to collect more information than can be captured by using standard fields. You can add a custom form to the registration and/or the booking process and even attach files to forms. It’s also possible to use a form by itself, for example to add a contact form to your website. Forms can be used in SuperSaaS by:
- Creating a custom form to collect specific details
- Adding a form to your registration or booking process to collect additional information
- Using a stand-alone form for other purposes
Creating a form
With the New Form Wizard, you can easily create a new form. Unlike the standard form used on the calendar, you can add as many fields as you need, and you have more control over the form’s behavior and layout.
Using the New Form Wizard
To create a new form, go to the Dashboard page and select New Form at the top. You will first be asked to choose between an Integrated form and a Stand-alone form. It is always possible to switch between the two types later. If you’re unsure which one you need, pick Integrated, as it is easier to set up. If you already have custom forms available, you will also see an option to use one of those forms as the basis for your new form.
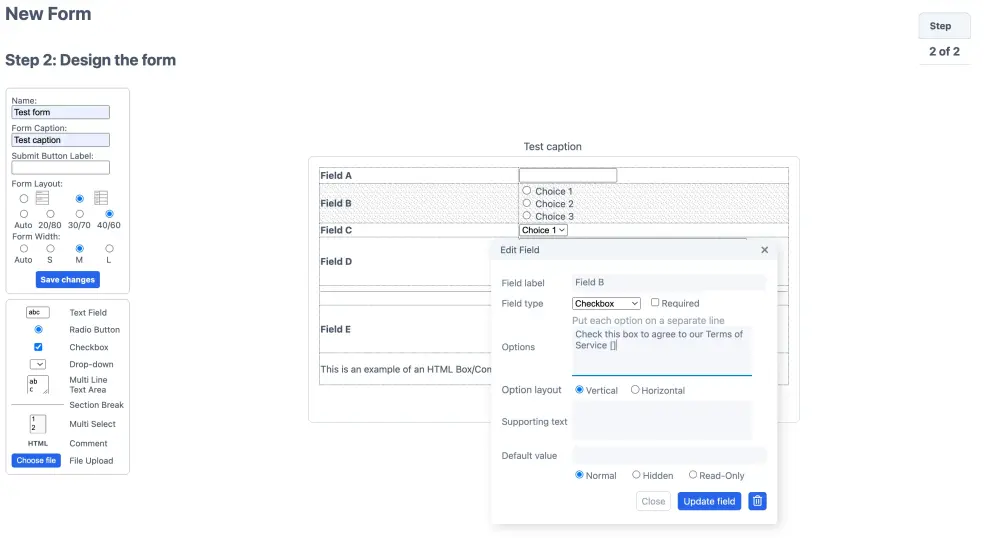
Adding fields
The next screen will let you design the form. Start by selecting a field type on the pane on the bottom left, for example a Text Field or a . This will show you a pop-up that allows you to customize the field by giving it a name, a default value and various other options that depend on the type of field you chose. If you do not want to label a field or add supporting text to it, the options can be left blank and the layout will adjust accordingly.
Most field types offer a checkbox. This means that the form cannot be submitted if the field is left blank. The Text Field and Multi Line Text Area also contain a checkbox. This option ensures that each form needs a different value in that field. This can be useful if, for example, you want people to pick a unique username. The Supporting text field allows you to add help text directly next to the field, helping your customer fill it out.
Working with Choice-based fields
There are certain fields such as and that allow you to create a predefined list of options for users to choose from. To create a list field, each list option must be listed on a separate line. The options listed on a separate line are the options customers see when filling in the form. To store data that is different from what users see, use square brackets [] behind each option. The value within the brackets will then be displayed and stored in the database.
New York Suite [room 1], the interface will show but if you download the form it will show room 1.
If you just add (empty) brackets to an option, nothing will be stored in the database. You can use this along with the option to make an option that cannot be selected.
A good way to use it is to make it the first option of a drop-down menu (Please select one [ ]).
This is the first option shown by default to the user.
Radio buttons and drop-down menus can have an optional text field.
This is useful in cases you want to add an “Other” option at the bottom of a list.
You can enable this by adding the special code [*] to one of the options.

Managing form fields
Each field can be set to one of the three options: Normal (default), Hidden, or Read-Only.
- If a field is set to Normal, it will function as usual and be visible to everyone.
- If a field is set to Hidden, it will only be visible to superusers and administrators, making it useful for adding internal comments or information that clients shouldn’t see.
- When a field is set to Read-Only, it will be visible to everyone, but only superusers and administrators can make changes to it. This setting is useful for things like a membership number, which customers can see but not edit.
If you want to hide an entire form, you can simply leave all the fields set to Normal and hide the form elsewhere in the system.
After creating or editing your field, save it by clicking . It will then appear on the form and you can create another field if necessary. Be aware that none of the changes on the form are saved until you click . You can also click the button on the form itself to save the page.
In most cases, it is not advisable to add any of the standard fields, such as email, to a custom form that will be integrated in a schedule. The system would not know how to use the data from your form to send email confirmations and would still try to use the data from the email field on the standard appointment or registration form instead. As an alternative, use the appropriate field on the standard appointment form. The fields from the appointment form can also be listed on the Supervise page of your schedule. See booking details for more information.
Adding file upload
If you want users to upload files, like a resume or photo, you can do that by adding one or more file upload fields to the form. For file upload to work you will need to have a (free or paid) Dropbox account. Your users do not need to have a Dropbox account.
In the form designer you can add an upload field to your form by clicking “File Upload” in the box at the bottom left. The first time you do this it, a button will appear that allows you to connect your SuperSaaS account to Dropbox. You only need to connect your Dropbox account once, and it will be used for all file uploads fields across all forms in your account. If you later want to disconnect Dropbox, you can do so by going to Configure > Overview on any form.
When someone submits a form with a file attached, the file is directly uploaded from their browsers to the folder Apps/SuperSaaS/your_form_name inside your Dropbox account.
You can then retrieve it by clicking the download icon anywhere you can view the form in SuperSaaS, such as the Supervise page of the form.
You can also retrieve it directly from your Dropbox, but if you have many users it may be difficult to tell which file belongs to whom.
As a rule, files stay in your Dropbox folder, even if the form or appointment that it was uploaded with gets deleted. The only exception is that if you edit a form that contains an uploaded file, and replace or delete the file, it will be deleted from your Dropbox.
Customizing the layout
When you want to edit a field, simply click on it and an Edit field pop-up will appear. If you want to reorder fields on the form, just click and drag the field with your mouse. Keep in mind that deleting a field will remove any data that was previously entered in that field from submitted forms. Changes will only be made permanent after saving the page.
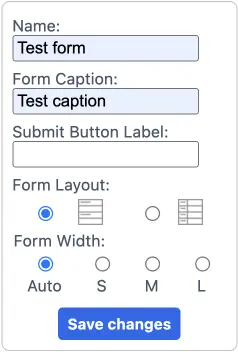
You can adjust the layout of the fields using the buttons in the top left pane. By default, fields are displayed with the label above the field. However, you can switch to a two-column layout where the label appears on the left and the field on the right. If you have fields without labels, they will span both columns.
- By default, the Auto setting lets the browser determine the optimal width, usually matching the largest field.
- To manually set the width, use the S, M and L buttons to choose 600, 750, or 900 pixels.
- If you’re using the two-column layout, you can adjust the relative width of the two columns to 20/80, 30/70 or 40/60. If left on Auto, the browser will adjust the columns automatically.
- You can also set a fixed width for text fields and a fixed height for text areas.
Via Layout Settings you can change the colors that are used for the various elements that make up a form (see also Changing a schedule’s appearance). HTML fields allow you to set both text and background colors. If you want to include images in an HTML field, they must already be available on the internet, as you can’t upload images directly in SuperSaaS.
Upon saving the form, you will be returned to the configuration screen. You can try out the form by clicking Use in the upper-right corner. If you want to change the form, click Configure. Continue working on it in the Configure > Design tab.
$if FR {Bonjour} $else {Hello}
placeholder="example" or pattern="[0-9]*" then those will be added as HTML attributes to the text field.
You can use this to ensure someone enters a valid phone number or birthdate.
Adding a form to your registration or booking process
An integrated form can be added to either the registration or booking process. If you want the form to be filled out for each appointment, then you should attach it to the booking process. You can add a form to a schedule via Configure > Process. As administrator, you will see a “Skip” option that will still allow you to create a booking without a form.

If, on the other hand, you want the form to be filled out only once per registered user, you should add it to the registration process. Adding a form to the registration process is done via Access Control. If you do not work with registered users then adding a form here will have no effect.

The option to attach a form is only visible after you’ve created at least one custom form. When you add a form you’re asked to select whether the form should be filled out by you or by users, and whether the form should be visible to them.
The form and the item to which it is linked to (either an end-user account or an appointment) only get saved to the database if both are completed. So if someone schedules an appointment and then closes the browser before filling out the attached form, then the appointment will not be saved.
If you send a confirmation for newly created appointments or accounts, you can attach the form to the confirmation message by including the magic word $form in the email text (see also Customizing messages and notifications).
Using a stand-alone form
A stand-alone form works the same way as an integrated form and can also be used as one, but it has extra features that let it function independently. For instance, you could use it to add a contact form to your site.
When you create a form, you can choose to make it a stand-alone form. Alternatively, you can convert an existing integrated form into a stand-alone form (and vice versa). Simply navigate to Configure > Overview and press at the bottom of the page.
A stand-alone form will have its own URL, through which it can be reached directly. Just as you can customize the schedule’s URL, you can also modify a form’s URL to include your own domain name. A stand-alone form also has two additional settings screens: the Configure > Process tab, which allows you to customize the form submission process, and the Configure > Messages tab that allows you to customize the messages that are displayed as part of the process. The settings on these tabs have no effect when the form is used as an integrated form; in that case the settings can be modified on the configuration screen of the schedule in which the form has been integrated.

The Configure > Process tab describes the process of filling out a form. A flow chart at the bottom updates in real-time as you make changes. In the first section, you can set restrictions on who can access the form and when it will be available. You can, for instance, close the form after a certain number of people have signed up or once a certain date has been reached and show a custom message afterward. This custom message can be defined on the Configure > Messages tab. Here you can also customize the “Thank you” message that is shown upon successful registration, as well as the optional confirmation email.
When you use hidden fields, the form will appear differently to your customers than it does to you. In order to see what it looks like to a customer, you will need to log out and go back to the page pretending to be a regular visitor or use another browser to look at the form. This process is identical to the testing of a schedule.