This tutorial will show you how to set up an online appointment booking system for your beauty and wellness business, such as beauty or hair salon. This tutorial uses a type of schedule meant for combining services and resources that can be used to book an appointment by multiple customers at the same time for multiple services you offer on your schedule. If you need to create a schedule for your barber shop or nail salon, or if you are a makeup artist or massage therapist it should be straightforward to adapt these guidelines to suit your particular needs.
This is an example of a service schedule that is connected to multiple resource schedules. In this tutorial, the service schedule checks the availability of staff members from a separate resource schedule (or multiple resource schedules, depending on your business requirement).
If you require group events or classes like training sessions for your salon, the “Capacity schedule” tutorial would be a more suitable option. A “Capacity schedule” is meant for group or class-type bookings. If you are planning to schedule only one person’s time, you can still use the service schedule as a standalone, or you could have a look at the “Resource schedule” tutorial which may be a bit easier.
Note that there are a few differences between the different schedule types and some of our customers prefer the service schedule’s appearance. While the resource schedule allows repeating appointments and arbitrary appointment durations, the service schedule enables services to take into account the availability of multiple resources.
Booking a Service
If you offer a number of services, your customers will be able to choose from a list of treatment options. Use the following steps to learn how to create an appointment schedule for several services requiring the availability of different staff members. We refer to the staff members as “resources”.
This tutorial demonstrates the following customizations:
- Using the schedule to offer online booking for a number of services
- Connecting the service schedule to different resource schedules
- Collecting payment with each service booked
- Sending email confirmations, automated reminders and follow-up messages
You can view the end result on the Beauty Salon booking demo. It’s possible to modify that page to make it appear as part of your site, but you can also integrate a SuperSaaS schedule as a so-called “widget”. A widget can appear as a small frame on your site, or as a small button, like the one below. With a widget, users can view availability and create a booking, but to change or cancel a booking later they will need to use the full schedule link, for example from their confirmation email.
Setting up the schedule in 5 easy steps
The easiest way to set up an appointment schedule is by using a build-and-test cycle: After the initial configuration you try it out, make changes, and repeat, until it works the way you want.
Step Setting up schedules for your staff and customers
As a first step we are going to create a separate resource schedule containing the availability of all your staff members. If each of the staff has a different availability then it can be more convenient to create a separate resource schedule for each one.
A resource schedule (which allows people to book one-to-one time with a particular resource i.e. the staff member) is the schedule type to use for scheduling each staff member’s time to ensure they cannot have two appointments that overlap. In this tutorial, we will create individual resource schedule for each staff member and later connect them into one service schedule for your customers to book multiple services offered by your salon.
Select the Type of Schedule
Click New Schedule on your Dashboard to start configuring your online booking system. You will be directed to the New Schedule Wizard where you can determine the default settings for your online booking schedule.
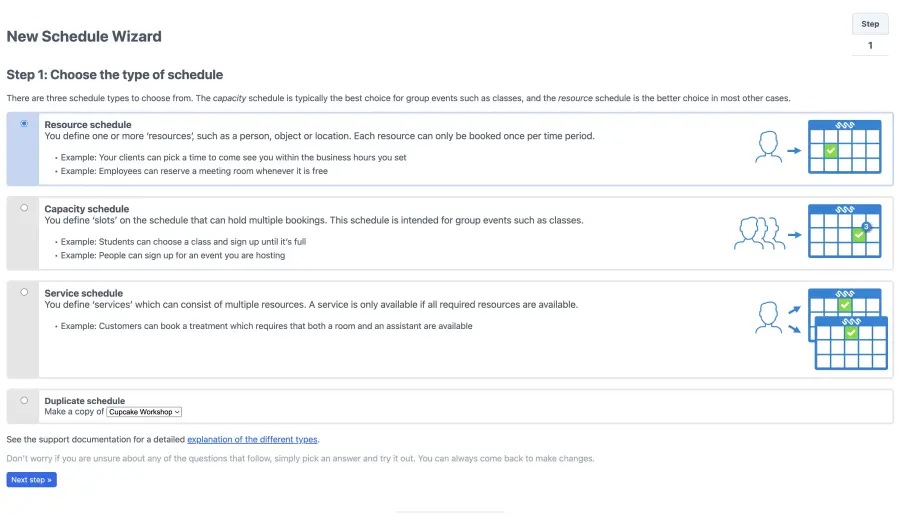
You will first need to choose whether you want to create a Resource, Capacity or Service schedule.
Select the Resource schedule type which allows people to book one-on-one with a person, thing or specific space. It is the one to use for staff members, because we want to ensure they cannot have two appointments that overlap with each other.
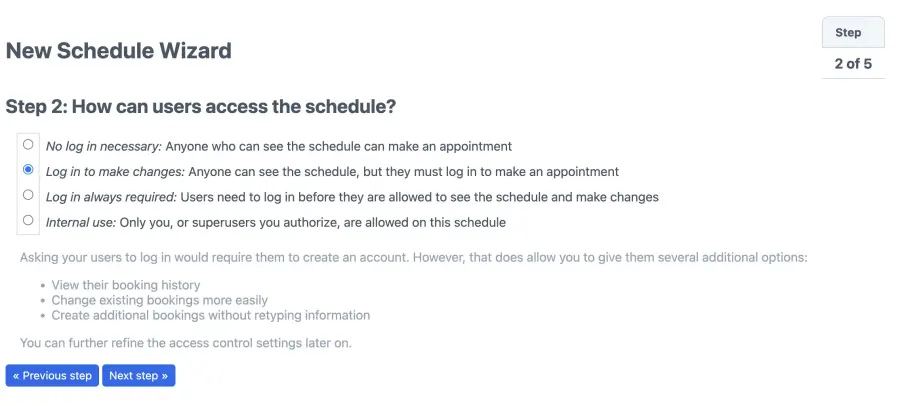
How can users access the schedule?
Typically, you will send your user to make appointments on the service schedule we will create later, and block access to this one, so the choice here does not matter. Select the option Log in to make changes: Anyone can see the schedule, but they must log in to make an appointment
Select one or more resources
A staff member is the only resource that can be booked, so the first option, One: A single resource, person, object or location is best for this type of schedule. This option is ideal when you want to create separate schedules for each staff member and set individual availability. If you have more than one person or item that can be booked, and they all have the same availability you can list them under the second option for multiple resources. In this tutorial, we will create separate schedules for each staff member to allow them the flexibility to choose their own availability and set their own holidays in their schedule.

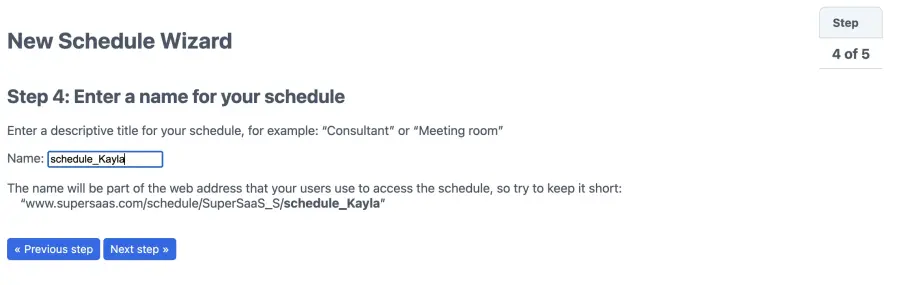
Provide a name for your schedule
The name of your staff member would be the obvious choice here. Type the name of your staff member, for example, “Schedule Kayla” and click Next.
Set your availability
The settings here provide basic constraints for your time. You can change the opening hours for individual days (or resources). When appointments begin and end at predetermined times, the system can create a clear user interface by generating predetermined time slots (or chips) that clients can click on to make an appointment. The salon appointment schedule demo shows this type of setup.
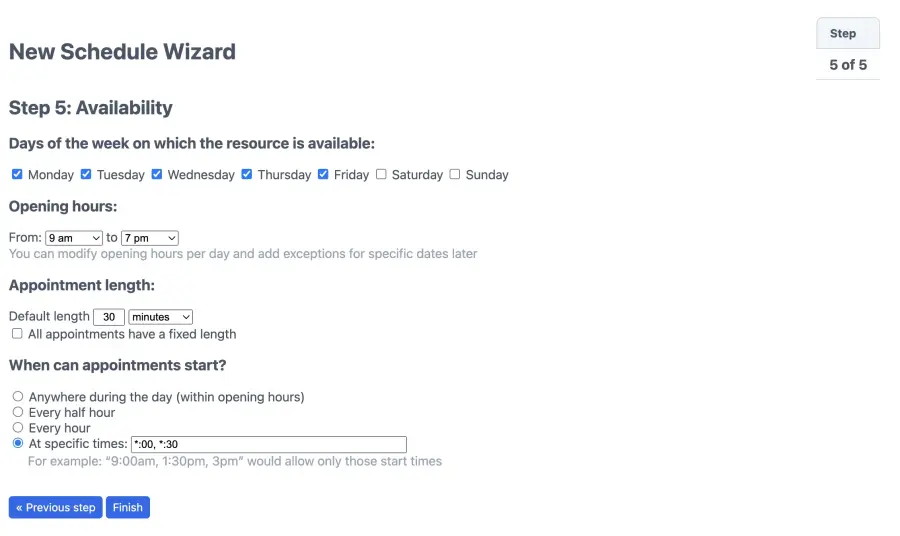
You can set appointments with a default length of 30 minutes and constrain the start times to every half hour by entering *:00, *:30 in the specific time option. This would make the system create a slot every half hour. If you offer treatments with differing lengths, it would be better to allow the user to click any spot on the calendar to select the required time.
Clicking Finish creates the schedule and makes it accessible online. You now have a functional appointment schedule for your staff member “Kayla”. You can create similar resource schedules for each of your staff members, say “Mary” and “John”. Click on New Schedule wizard icon and then you can create identical schedule settings with “Duplicate Schedule: Make a copy of Schedule Kayla” option.

Once your individual resource schedules for your staff members “Kayla”, “John” and “Mary” are set up, move on to the next step.
Create the online booking schedule for your customers with all services
Next, we create a Service schedule for your salon which can be easily used by end customers to book a service with your salon. A service schedule can use resource schedules to align and organize different people or parts into one schedule to avoid conflicts. All resources can be in a single resource schedule, or you can put them in separate schedules. If you have interchangeable resources, for example you could have multiple rooms and the service can be provided in any of them, then those resources can be conveniently placed in the same resource schedule without compromising any functionality.
Click New Schedule on your Dashboard. Select the Service schedule, which allows you to list your salon services and apply default duration values if needed. We choose to name this salon as “Your Beauty Salon”.
Define services
Since we have already created the individual resource schedules for each of our staff members, we use the drop-down selector next to each service to define which resource(s) are required for the service to become available.

Enter “Men’s Haircut” as the first service and connect it to the resource schedule “Schedule John”. Enter other services like “Women Haircut” and “Facial” and because only “Kayla” is capable of providing the service “Women Haircut” and “Mary” of providing “Facial”, you can select resource “Schedule Kayla” and “Schedule Mary” for corresponding services. Add the default duration of each of these services as 30 minutes for men and women haircut and 60 minutes for the facial.
If you assign two people to a service, that means both will be needed at the same time to perform the service. If you want to indicate that one or the other person can perform the service, then that’s possible too. The option to configure is found on the configuration screen after the setup wizard completes. As an aside, if you define only a single service the user interface will adapt to hide the service selector widget.
Set your salon’s availability
The settings here provide basic constraints. You can change the opening hours for individual days (or resources). When appointments are configured to begin and end at predetermined times, the system can create a clear user interface by generating predetermined time slots (or chips) that clients can click on to make an appointment. The beauty salon appointment schedule demo shows this type of setup.
Click Finish to activate this schedule online. Step 2 will help you test your schedule to ensure that it works as expected.
Step Testing the schedule to see if it works as expected
Regular users will see the same schedule but with fewer options. You can also find Use by going to your Dashboard.
Booking a Service
If you created more than one service (like we did in our tutorial), you will see them in a column on the left side of your Dashboard. To book a service, click one of the available time slots and a New reservation dialog window will appear. If this window is in an inconvenient place, you can simply drag it to a more suitable place on your screen.
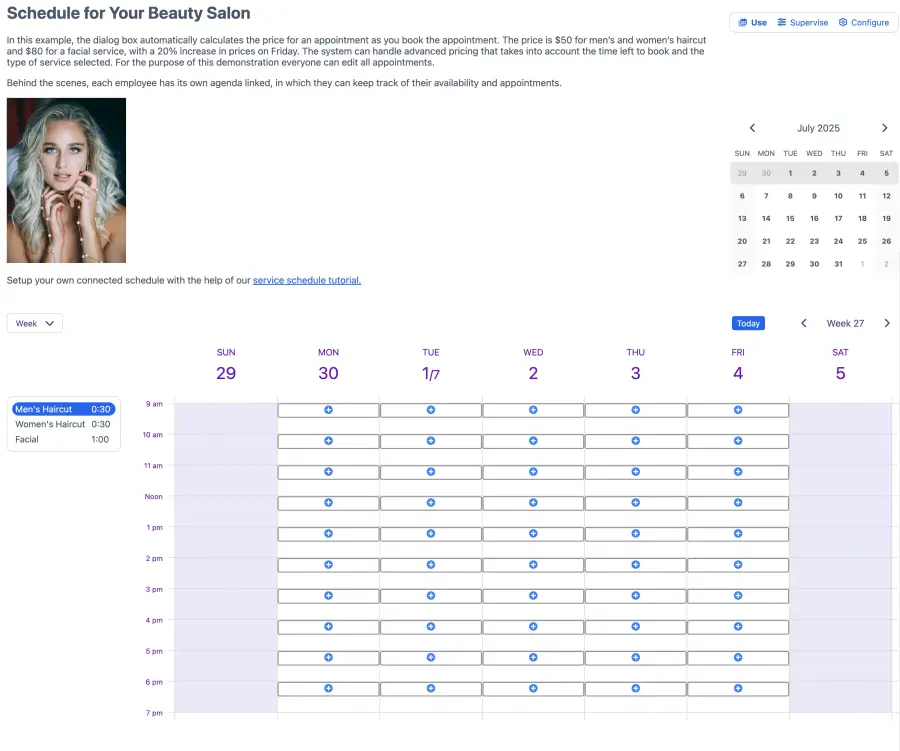
To set the appointment date, you can either use the pop-up calendar or manually enter a date. By default, the system only asks for a name and a phone number, but you can add additional fields to collect more booking details.
When you click Create reservation, the schedule updates to show your booking and adjusts the availability accordingly. If you would like to edit an appointment, click on it again to make changes. Be sure to click Update reservation before closing it, otherwise, you will lose the changes.

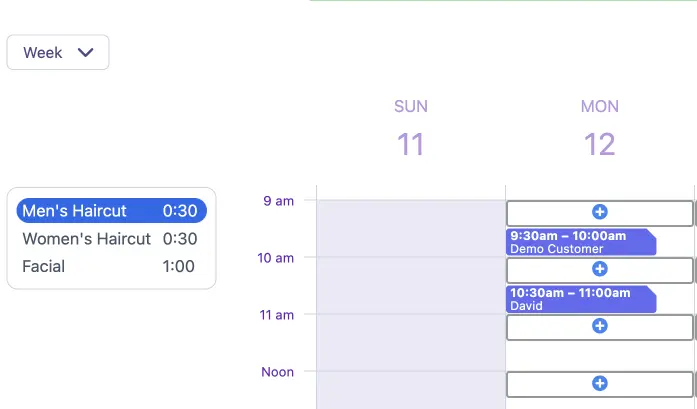
Appointments that are linked to resources (staff members) will also show up on the resource schedules, but note that they cannot be edited there. Clicking on an appointment there will provide a popup with a link to the schedule where it can be edited. If the same appointment shows up in multiple linked schedules, it only counts as a single appointment in your subscription usage.
Step Adjusting the configuration
Click Configure to go to Overview section for a summary of the different options you can change. Here, you can temporarily block the appointment schedule while you work or delete it entirely.
Configuring Services
The Services tab lists the services available and how they relate to resources. When you click New Service, or click the edit icon of an existing service, a window appears where you can change the details. You can click and drag the rows to change the order in which the services are listed. You can also change the color of a service by clicking the colored box in the top right corner of the window.
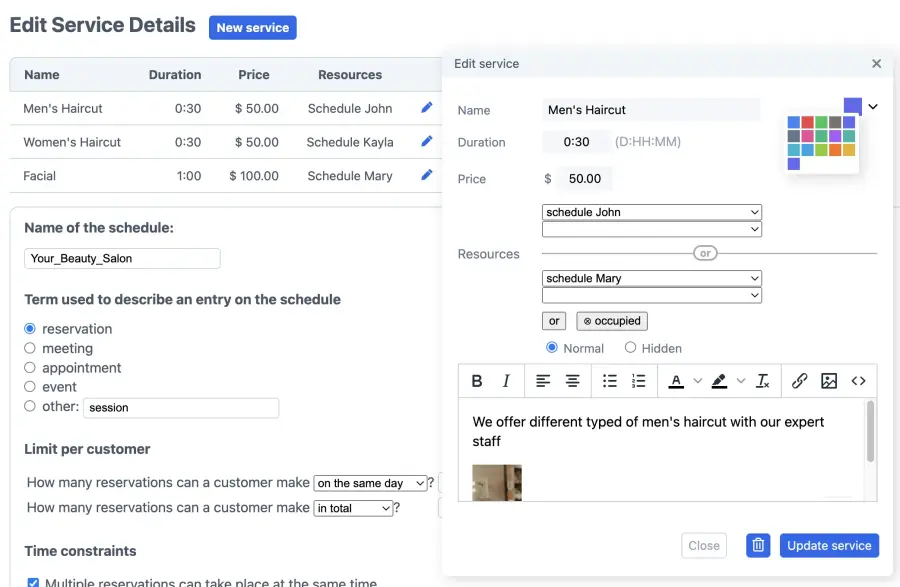
In the field at the bottom of the editing window, you can enter a description of the service that will appear when the service is selected. It can contain formatting and pictures but note that you can only link to pictures that are available online. You can also specify the default length of each service appointment.
Determine Resources for each service
When your account contains resource schedules, the service editing window will also contain a section marked Resources where you can indicate which resources from these schedules need to be available when making an appointment. For example, you could specify that a service “Men Haircut” needs both a specific staff member “John” and a specific piece of equipment like “Hair Dryer”. Or, if more than one staff member can give a service then you can click the “or” button and list each one.
To add new resources, go to your Dashboard, click New Schedule, and select the Resource type schedule. You can also add additional resources to an existing resource schedule via the Resources tab.


You can further customize if you want the customers to select a service from a selection list or automatically preselect the first service offered on your schedule.
In case of resources, when you want your users to select the resource of their choice for an individual service, you can allow the system to show the selection list, pick at random or pick the first available resource at the time of a new appointment.

Configure the individual resource parameters
In this tutorial, the individual resources schedules define each staff member. Each schedule contains the settings that define the staff member you are scheduling in your salon. You can add/delete/modify the availability of each staff member in their individual schedule. Note that if you delete a resource, all the associated reservations will also be deleted.
You can find more information about the wide range of configurations under Access, Process, and Layout in the support documentation pages.
Set time constraints
In the Constraint start times field, you can list the times that your clients can select as a start time. When the start times, as well as the length of appointments, is fixed, the system can display a user interface with ‘chips’ the client can click on to make an appointment. In this case, the default length will set the size of the chip.
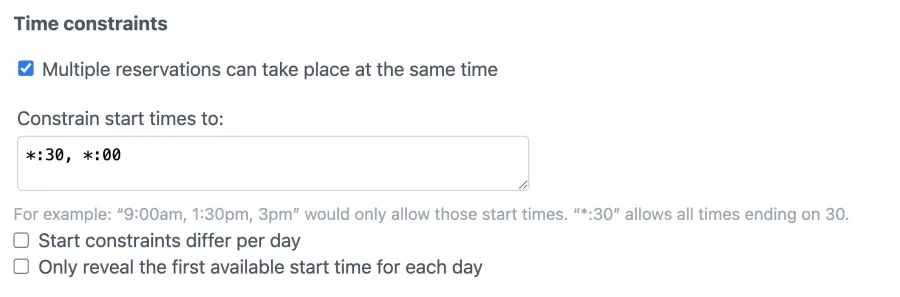
Note that if you don’t enter start time constraints, an appointment can potentially start at any time, possibly leaving your appointment schedule full of weird time gaps. Set a suitable rounding time to avoid clients booking irregular times such as from 2:07 pm to 2:23 pm. If you specify start time constraints as well as rounding times, only the finishing time will be rounded. Another alternative to remove random starting times is to automatically configure the system to round to the nearest multiple of 5 or 10 minutes.
If, as the administrator or superuser, you would like the option to set a different length for a service you can check the box Allow superusers and the administrator to ignore all time constraints on the Supervise > Opening Hours tab. This setting lets you enter an arbitrary finish time on the appointment schedule instead of creating a separate service for it.

Define your reservation
Under Term used to describe an entry, you can customize the term you want to use in place of “reservation”. In this example, “beauty session” or “salon booking” may be preferable. This term will be used in all dialog windows, help text and email confirmations.
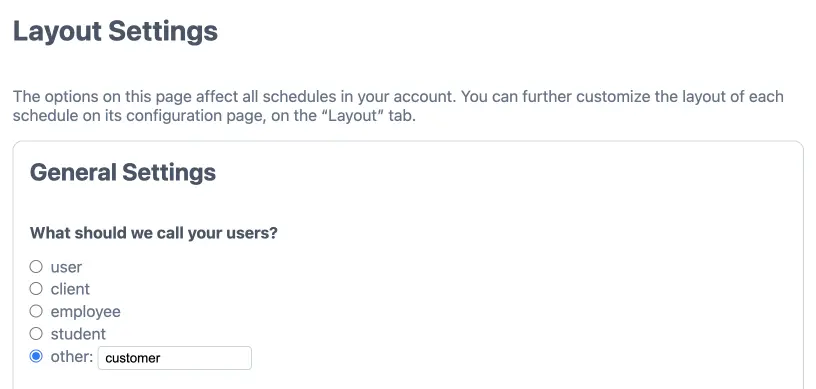
You can select a term from the list or use your own custom term that will describe your service appropriately. Enter the singular form and the system will automatically convert it to plural where appropriate. You can also change the term used for “user”, for example changing it to “client”, under the Layout Settings. This will apply across all schedules in your account.
Setting prices for your services
Specify what you will charge for a booking. Whether you require payment can be configured via Process tab. The payment method can be configured via the Dashboard under Payment setup.

You can choose a fixed price or base the price on the length of the appointment, the day of the week or several other factors. If you allow repeating appointments, the specified amount will automatically be multiplied by the number of appointments a client makes. SuperSaaS offers you a broad array of payment options, ranging from presenting services’ and resources’ prices to handling online payment or using our credit system. You can also configure the system to offer your clients various types of discounts and promotional offers.
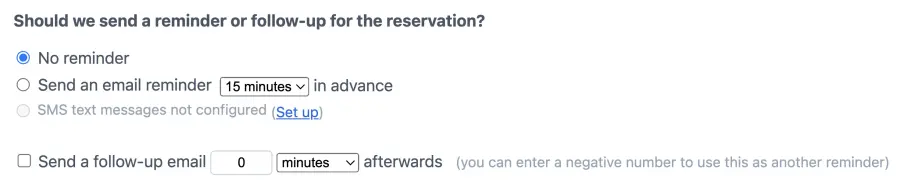
Setting automated SMS/email reminders and notifications
The system can send automated text or email reminders to your customers a specific time before the appointment starts. In addition to the reminders, you can also configure automated follow-up messages to get feedback from your customers. You can enable the system to send an email reminder via the Process tab under the Configuration section of your schedule. You can customize all these messages via the Layout tab of your schedule. In addition to the reminders, you can also customize the messages displayed on your login screen, the white space above your schedule and on your checkout screen. You can read more about customizing email/text reminders and customizing display messages in our support documentation.
More information can be found under adding payment to your booking schedule.