
Follow this tutorial to learn how to create an online room booking system for multiple meeting rooms at your organization. You can adapt these guidelines to match your individual requirements.
Creating a room booking reservation schedule
This tutorial is an example of a so-called resource schedule with multiple resources. This type of schedule works great when you want to accept bookings on a single schedule, for example, managing the availability of three meeting rooms and a projector in your office.
If you need to manage multiple resources and automatically coordinate many schedules together, for example, 15 meeting rooms, 10 projectors and 12 white boards, etc. you can create multiple resource schedules and connect them into a service-type schedule with the help of our “Service schedule” tutorial. If you’re looking for a group event booking system to organize events, training sessions within your organization, then the “Capacity schedule” tutorial would be more suitable.
This tutorial demonstrates the following:
- Using the SuperSaaS booking system as a simple room reservation tool
- Sending customized email confirmations and reminders to users
- Limiting access of the schedule to specific teams
- Adding a buffer time between bookings
You can view the end result on the Meeting Room Booking demo. It’s possible to modify that page to make it appear as part of your site, but you can also integrate a SuperSaaS schedule as a so-called “widget”. A widget can appear as a small frame on your site, or as a small button, like the one below. With a widget, users can view availability and create a booking, but to change or cancel a booking later they will need to use the full schedule link, for example from their confirmation email.
Setting up the schedule in 6 easy steps
The easiest way to set up an appointment schedule is by using a build-and-test cycle: After the initial configuration you try it out, make changes, and repeat, until it works the way you want.
Step Setting up the basic schedule using the New Schedule Wizard
Select the appropriate schedule type
Select the New Schedule button on your Dashboard. The system will redirect you to the New Schedule wizard which will help you determine the basic settings required to set up the meeting room booking system.
The first choice in the new schedule wizard is to select whether you require a Resource, Capacity or Service schedule.
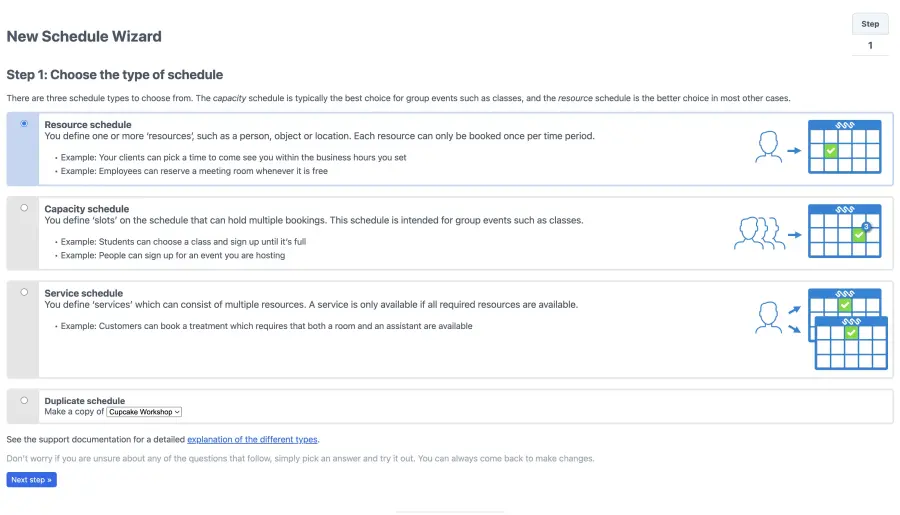
We select the Resource type schedule for your room booking system, because a meeting room can be booked only once per time period.
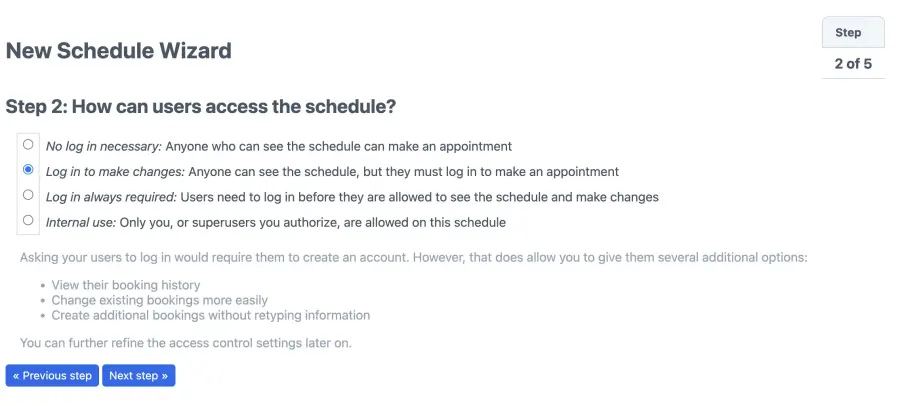
How can users access the schedule?
Typically, you would want users to create an account before they are allowed to reserve a meeting room, so here we select: Log in to make changes: Anyone can see the schedule, but they must log in to make an appointment.
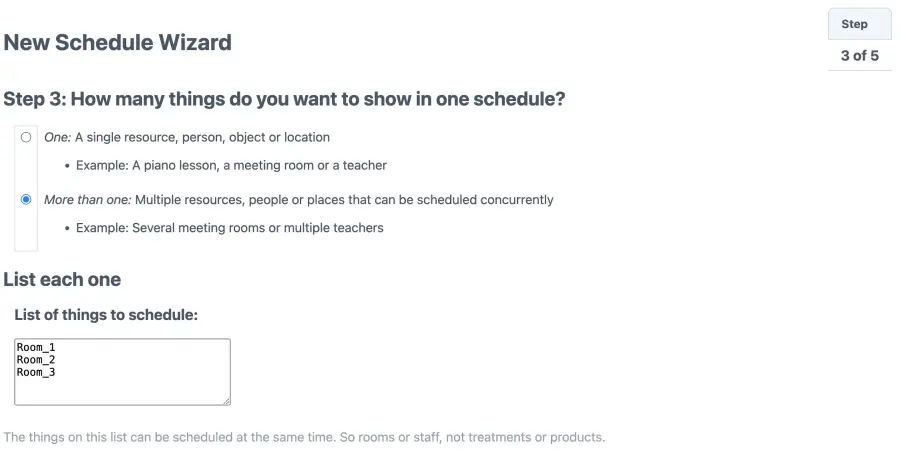
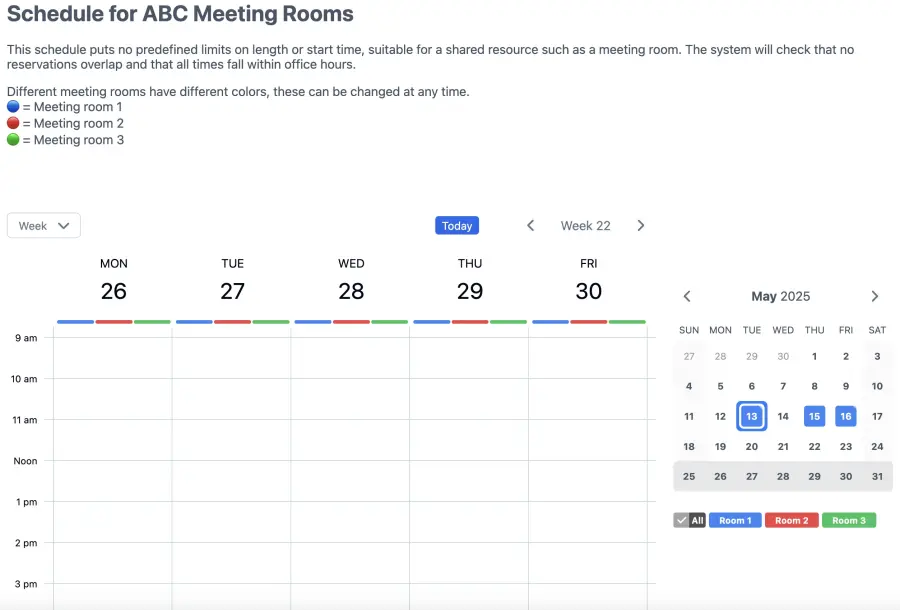
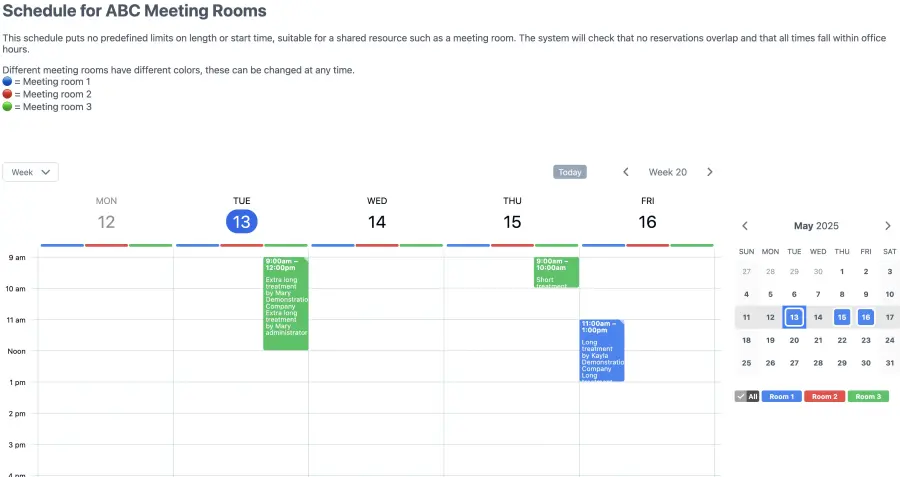
Add your meeting rooms and resources
In step 3, the system will ask you to list all the resources you want to schedule. Select More than one option when you have more than one meeting room to schedule concurrently. In this tutorial, we have three company meeting rooms available. You can of course, add fewer or more to the list. You would select the option One if you have a single meeting room available.
After you select the More than one option, you can list all your meeting rooms and resources that users within your company can book. Enter “Meeting Room 1” and click Add. Repeat this step for all your meeting rooms and resources. Once you have added the required resources, click Next to move to the next step.
Adding a name to your meeting room reservation schedule
The name of your schedule in combination with your account name will form the URL of your meeting room booking schedule. We suggest you provide a short but descriptive name such as “ABC Meeting Rooms” and click Next.
It is possible to change the name of your schedule (as well as your account name) at a later point. However, changing the account name or schedule name will change the schedule’s URL and you may have to communicate this change to all of your users to ensure they land on the right page.
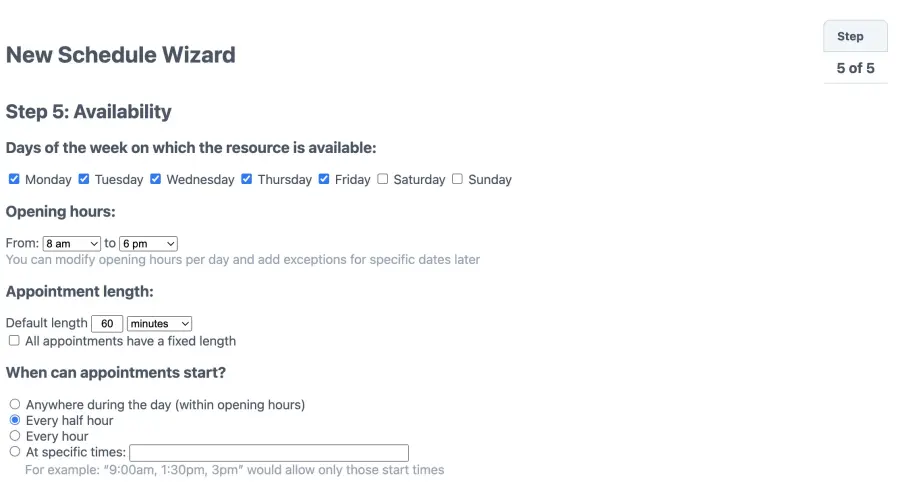
Set your availability
The settings in the final step provide basic constraints. After the setup finishes we will refine those in the next steps. When appointments are configured to begin and end at predetermined times, the system can create a clear user interface by displaying time slots that clients can click on to make an appointment. The meeting room booking demo shows this type of setup. We configure the appointments to start at 3 fixed times by entering “9:00am, 12:00pm, 3:00pm” (entering “9:00, 12:00, 15:00” would work just as well if you like to use a 24-hour clock). Click Next step one final time.
Clicking Finish creates the schedule and makes it accessible online. You now have a functional appointment schedule. Move on to Step 2 to check that it works as expected.
Step Trying out the schedule to see if it works as expected
Regular users will see the same appointment schedule but with fewer options. You can also find the Use button on your Dashboard page. You can access your Dashboard via the menu in the top right corner of your screen. Furthermore, you can also bookmark the page in your browser for daily use.
Create a reservation on your schedule
When you enter your meeting room booking system for the first time, you will see a completely empty schedule. Create your first sample booking by clicking anywhere on the empty schedule. A New reservation box will appear on the screen. If this window appears to be in an inconvenient location, you can simply drag the window to a more suitable location on your screen.

To add a booking for a specific date, you can either click on the date on which you want to create the booking, or alternatively, click anywhere to pop up the new reservation box, and edit the date listed. By default, the system only asks for a name and a phone number. You can customize standard fields, add additional custom fields or attach custom forms with the booking to request specific details. The New reservation window will also display a drop-down menu which allows you to select which meeting room you want to book.
Click Create reservation button to add the booking on your schedule. The schedule will automatically update and show the space in the schedule as occupied. You can edit the appointment by simply clicking on it to modify the details. Don’t forget to click Update reservation to save the changes before closing the dialog box.
Step Adjusting the booking configuration
You can customize the schedule to match your individual requirements by clicking on the Configure button in the main menu. The Overview tab allows you to temporarily block or delete your schedule entirely.
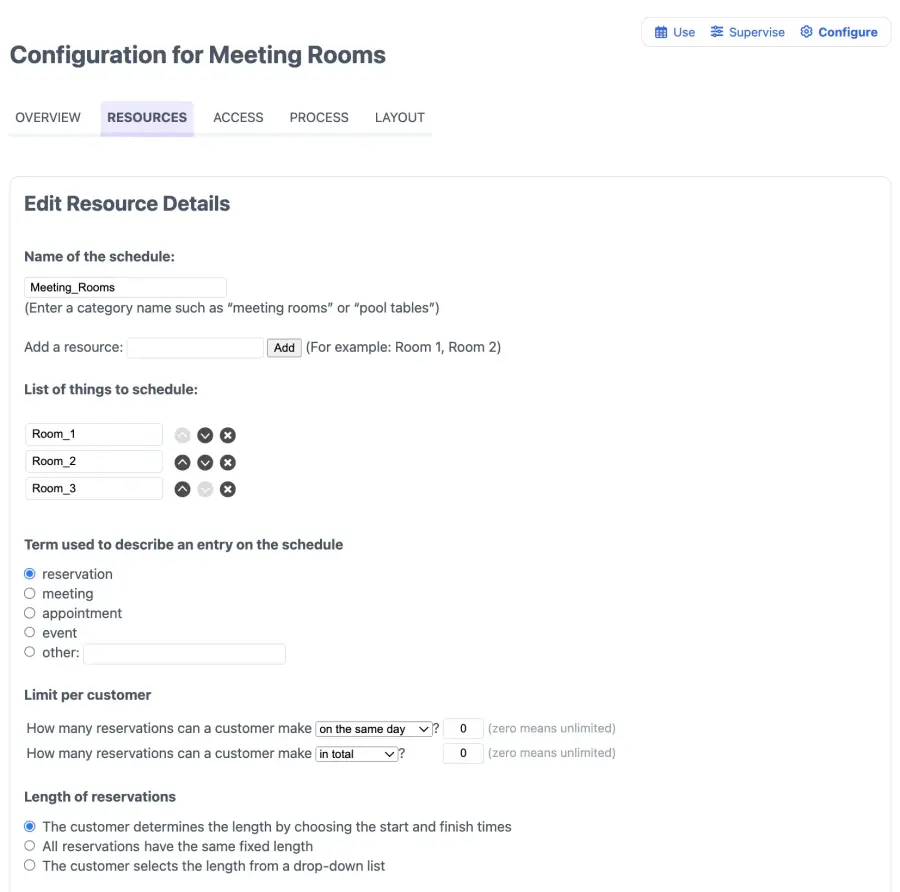
Configure the resource parameters
The Resources tab allows you to define the resources that you want to schedule in your room booking system.
In our case, the three meeting rooms are the resources we plan to manage with our schedule. You can easily add more rooms, for example, another conference room to the schedule. It is also possible to add other resources like projector, conference room displays, connecting wires, etc. However, when you want to allow users to simultaneously select more than one resource or a combination of multiple resources, then we recommend using the service type schedule.

Customize terms used
In the section “Term used to describe an entry on the schedule” you can define how the system refers to your bookings. In our room booking system, the term “meeting” is the most suitable. This term is used across dialog boxes, help text and email confirmations.
The term used to refer to your “users” can also be customized, on the Layout Settings page on your dashboard.
Define booking limits
The section Limit per user allows you to limit the number of bookings per user at a given frequency of time. You can customize how many bookings can be created by the user on the same day, in the same week or during the same month. When the user reaches the limit, they’re only allowed to change or delete their existing bookings. You can configure the system to take previous bookings into account or only consider bookings in the future.
Determine length of reservations
You can configure the default length of room bookings on your schedule. The system allows you to customize 3 options:
- Arbitrary booking length: The users can select any arbitrary time length duration of the slot, for example, 12 minutes, 56 minutes and so on. This may seem a little weird for the other users. Hence, to have better control you can specify the minimum and maximum time duration of a booking. For example, minimum time duration should be at least 15 minutes and maximum up to 4 hours. You can also specify that periods should be rounded to multiples of 10 minutes, for example.
- All room bookings have the same fixed length: You can set a default fixed length for all room bookings on your schedule.
- Users select a predefined booking length: Allow users to select the booking length from the list of predefined options. When you select this option, a selection box is displayed below the option. In this box, you can follow the instructions listed there to enter a list of lengths to choose from.
In our example we allow the users to choose the start and finish time of the booking. To avoid odd start and end times, we add timing constraints in the next steps in the time constraints section.

Configure pricing options
If you’re managing a meeting room or a collaborative space that you’re planning to rent out, you can configure the pricing options. SuperSaaS offers a broad array of payment options for your room booking system. This includes working with managing online payments via PayPal, Stripe, Mollie or ePay, creating a credit system, adding pricing rules, and setting up discounts and promotions.
In this section, you can decide if you want to charge a fixed price, determine the prices based on the list of options you provide, or configure the system to calculate the prices based on date, length, resource or several other factors. The payment method can be configured on the Payment Setup section on your dashboard. You can follow the steps listed under our payment setup tutorial, to configure payments.
In our tutorial, we’re setting up the meeting room booking system for internal use and hence, do not need payment settings to be configured.
Manage time constraints
Under the Resources tab, you can specify the default length of your bookings, add buffer time in between reservations and add start-time constraints for your bookings.
In the previous step, you chose to allow users to select their own time duration. However, to keep it user-friendly, you may want to set the default time duration to 30 minutes. You can change it to any value that suits your requirements. Next, you want to specify the minimum and maximum length of bookings permitted on your room booking schedule. In this example, we set the minimum length of reservation to be 15 minutes and maximum to be 120 minutes. Adding time constraints will restrict the length of each booking within the defined limits.
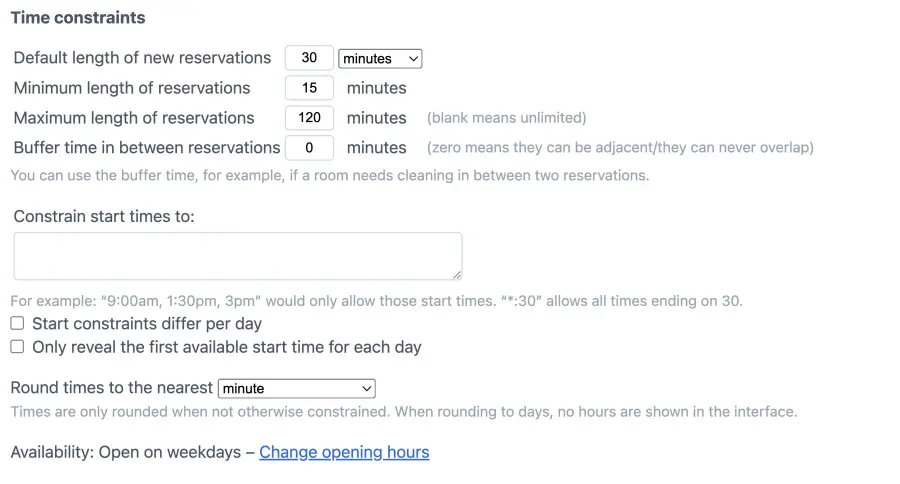
If you set the buffer time to zero, then the room can be booked back-to-back without leaving any room for adjustments and cleaning up after the meeting. Adding a buffer time between meeting ensures a smooth transition between meetings. For instance, this time could be used to clean the room between bookings or accommodate time required to set up and test any equipment for the next meeting. The buffer time is applied at the closing time of the previous appointment. In our case, we assume a 15-minute buffer time before the next meeting is scheduled in the meeting room.
In the Constrain Start Times field, you can restrict the start times to certain intervals. If you don’t enter any start time constraints, the bookings on the schedule can begin at any random time interval like 3:09 pm or 11:32 am and so on. If you do not add any start time constraints, then your bookings can potentially start at any time leaving your room booking system with a lot of gaps leading to ineffective utilization.
You can close these gaps by constraining the start times to start every 15 minutes. You can enter *:15, *:30, *:45, *:00 in the constraint start times box. This would ensure that any appointment starts at a time interval of 15 minutes only, for example at 3:15 pm, 11:45 am and so on.
You can further close the gaps on your room booking schedule by rounding off the end time to the nearest quarter-hour. This would round off end times like 3:52 pm to 4:00pm, 1:07 pm to 1:15 pm, and so on.
You can further limit the availability of your room booking system by adding your opening hours and special holidays. You can click on the Change opening hours link or edit your opening hours via supervise screen, opening hours tab, of your schedule.
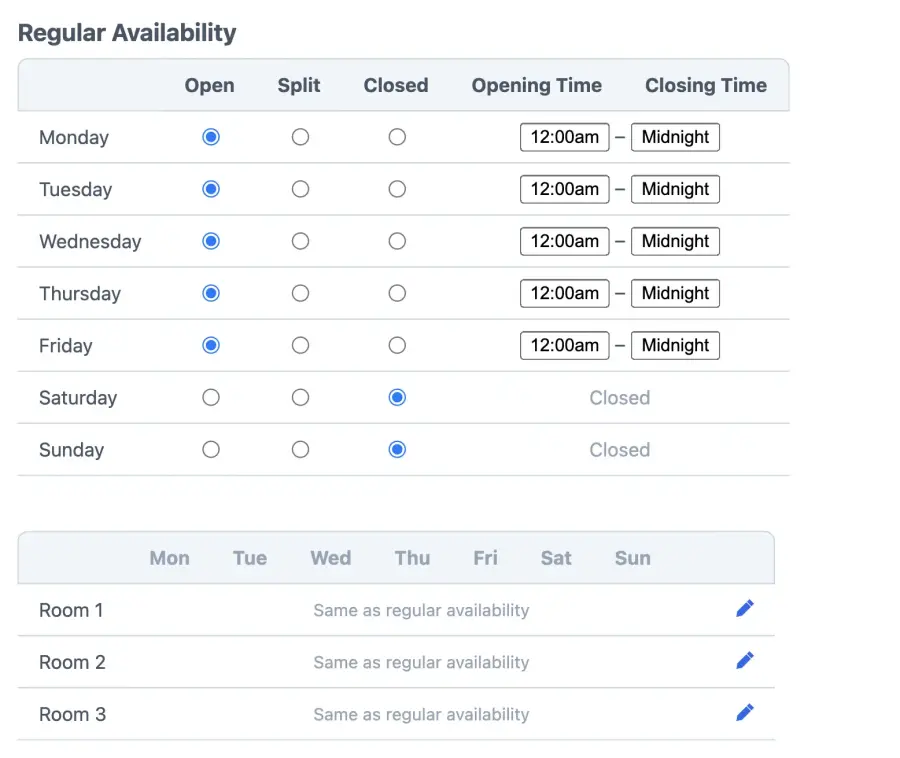
It is possible to have different availability for each meeting room/resource you’re managing in your schedule.
Step Customizing your schedule process flow
Define the user process
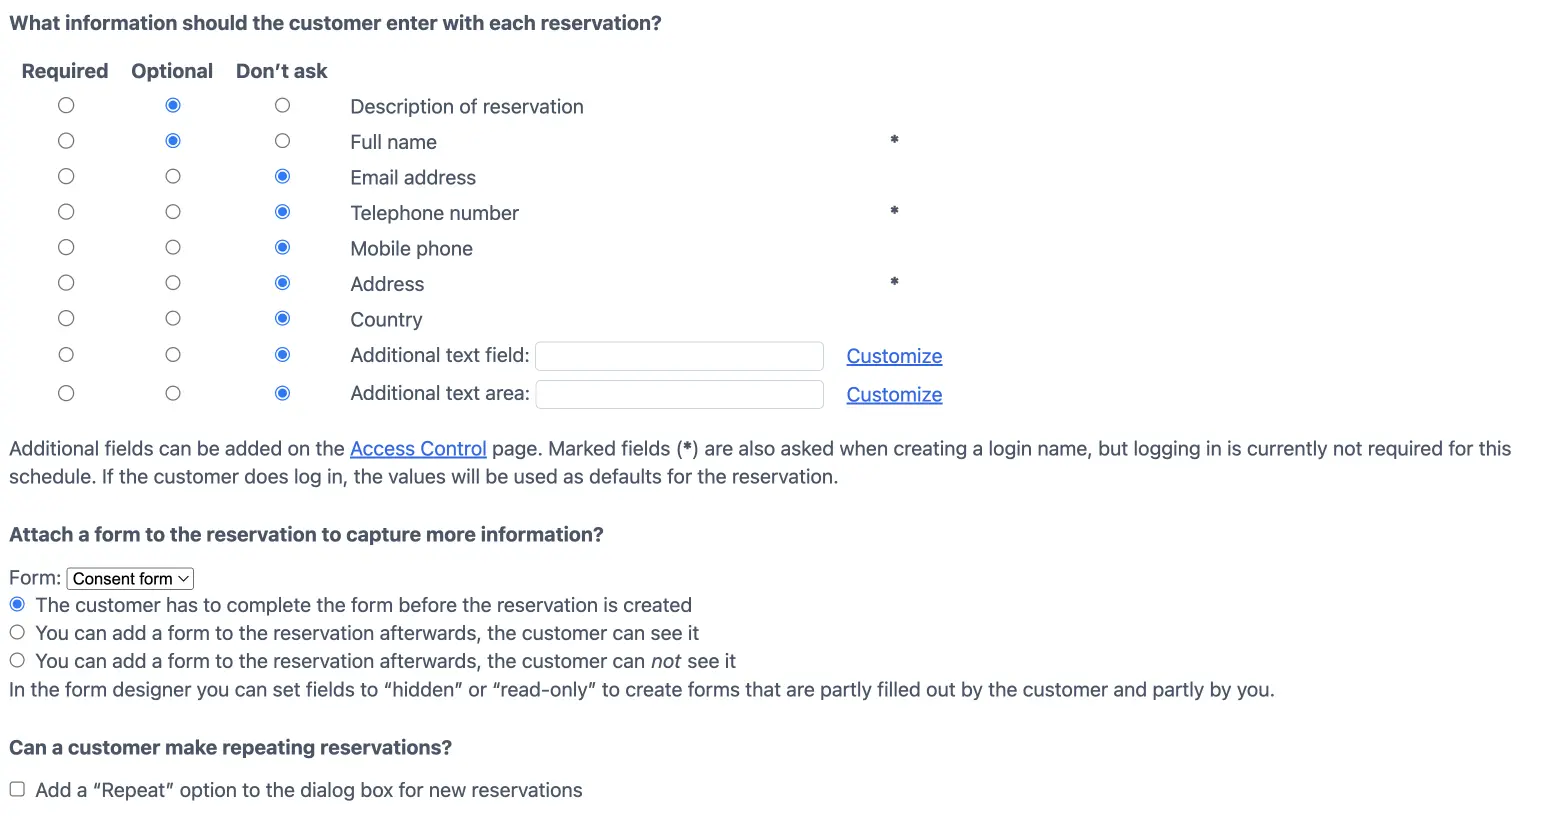
You can easily customize the booking flow on your room booking system. Under the Process tab, you can customize the fields you want the user to enter with each reservation. You can request additional details like special requests by adding a custom field with the Customize link. You can also attach custom forms along with your booking and allow users to create a repeating booking on the schedule.
Create your own cancellation policy
Prevent appointment cancellations leaving a gap on your schedule. Create your own cancellation policy and stop the users from making any changes at the last moment. Specify how far in advance can a user add, change or delete their reservations.

As admin, you are not subject to these rules and hence, you can add, delete or modify the booking at any point in time. So to confirm it’s working as desired you would want to log in as a regular user.
Send automated email/SMS confirmations
Send automated confirmation and reminder messages to your users by configuring these settings under the Process tab. You can choose “always send a confirmation email” or allow the users to select whether they want to receive confirmation emails.

If you want users to reach a landing page or website information page after the booking confirmation, you can also add a redirect URL. This is a helpful option when you’re renting out the meeting rooms to external users and want to redirect them to your website to explore further.

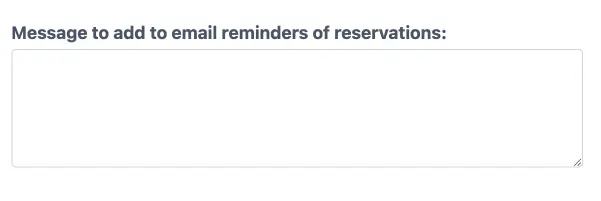
Next, you can manage the frequency of reminder and follow-up emails. Select the Send an email reminder option to always send a reminder message via email. You can also send reminders via SMS. Share further instructions on how to leave the meeting room for the next user in an automated follow-up message. You want to send this follow-up message just before the meeting ends, probably 5 minutes before the end time of the appointment. Select the send follow-up email option and enter a negative value to send a follow-up email before the appointment end time. Optionally, you can personalize and customize each of these email notifications on the Layout tab of your schedule.

As an admin, it would be a good idea to receive an overview of all the bookings once a day. You can add your email address or phone number under the Should we notify anyone else of a new or changed reservation? to receive an overview once a day.

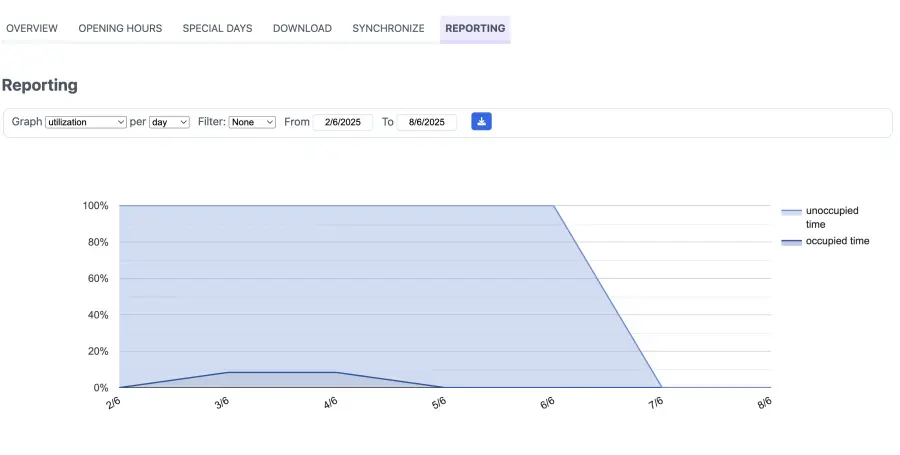
Monitor booking statistics
Keep a close watch on your booking statistics. You can view the booking statistics under the Reporting tab of the supervise screen of your schedule.
Controlling who can access your schedule
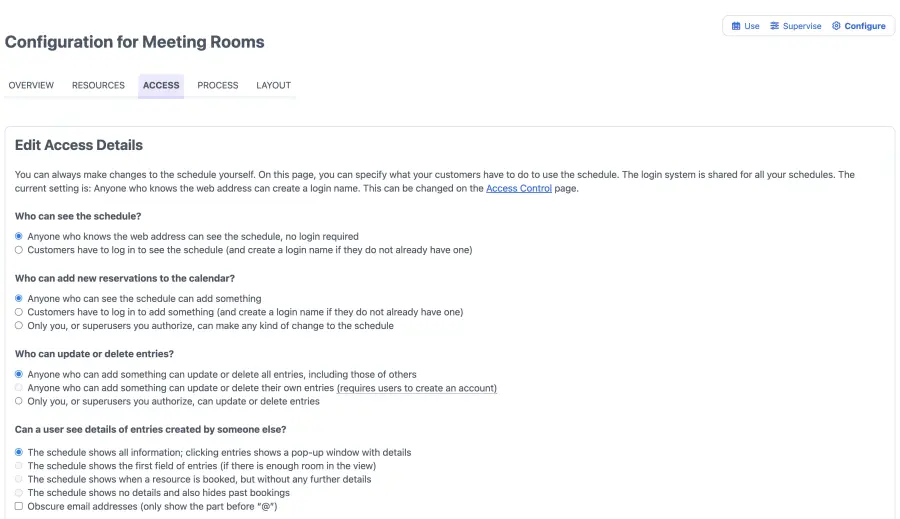
You have complete control over who can access your schedule. Under the Access Control page you can control the global settings for your account. You can control access to each schedule under the Access tab of each schedule. In addition, it is also possible to provide special access to users on your team and to limit access of certain schedules to certain user groups.
Assign user roles
Provide special access to certain users on your team by adding them as superusers and specify what superusers can do on your schedule. You can also modify who can see the schedule, who can add new reservations, and who can update or delete entries on the schedule. Furthermore, you can hide the details of each booking from users for privacy reasons.
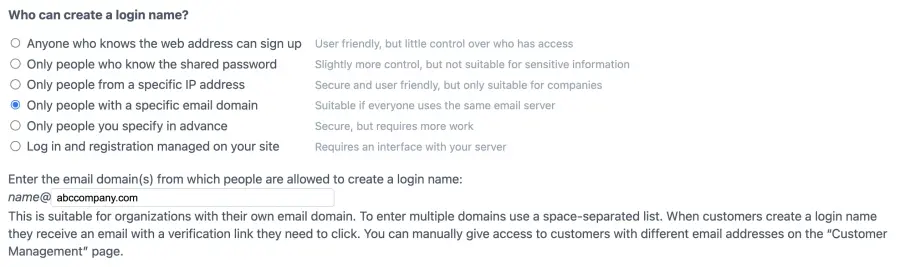
If you’re using the schedule internally within your organization, you may want to allow only users with a company domain email address to create a login name.
Create user groups
Enable fine-grained control over your schedule access with the help of the user group feature. Create groups for individual departments like a marketing department, finance department and so on. Next, add users to their respective user groups. After you have created your user lists, you can assign schedules to each group. This can be useful when there are certain meeting rooms and resources which are only accessible to a certain department while others are accessible by all. It is also possible to assign multiple user groups to the same schedule.
Step Testing the schedule from a user’s perspective
You need to test the schedule from your user’s perspective to ensure everything is working as expected. A schedule appears differently to an admin than to a user. Hence, we recommend using the build, test and repeat cycle.
A quick way to test the schedule is to copy your schedule URL in the incognito mode of your browser. You can then use one of the browsers to log in as a user and the other to stay logged in as the administrator. Alternatively, you can also install a second browser and test out the room booking schedule in the second browser.
You can find the schedule link under the overview tab of the configuration screen of your schedule. Once you’re confident that your booking schedule behaves as expected, you can start accepting bookings by sharing your schedule link. Every schedule has its own web address, which the users can click to start creating bookings.
Please note: New users may need to create a login ID and password the first time. Next time, they can simply log in with their existing ID to add or update any bookings, as per the system configurations.
Step Sharing the schedule link with your users
Once you are happy with the way your online booking system looks and have tested it to ensure that it behaves as expected for someone visiting your schedule, you are ready to direct people to it.
There are a few ways you can share your schedule:
- Put a link or button on your site that redirects people to your schedule
- Put a widget on your site that allows people to stay on your site while they book
- Add a “Book Now” button to your email and social media channels
Learn more about each of these options in the section “Integrate a schedule in your website”.
Your SuperSaaS booking schedule can be easily accessed across multiple devices anytime and anywhere with its schedule link. You can also create your own custom domain name and white label the software to make it completely your own.
Sync your appointments with existing work calendars
You can make it easier for your users to add the appointment details to their calendar by adding an “iCalendar” file to your confirmation emails.
Add the auto text $ical in the message of your confirmation email by going to the Layout tab of your schedule’s configuration screen:
Here’s an overview of how your confirmation message will appear to a Gmail user:
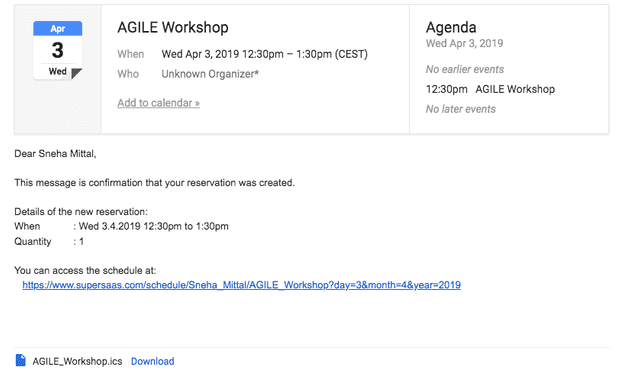
Please note:
The email might appear in a different format for different email providers.
However, as long as the auto text $ical is included in the message, the iCalendar file will be attached to the email.
Customizing the schedule appearance
You can use the space above the schedule to share further booking instructions for end users. You can easily customize and personalize your message and notifications with details like name, credit level, direct link to modify the booking, etc. Read our blog post to learn how to personalize your emails with SuperSaaS.
If you’d like to change the schedule’s appearance, you can try out several formatting options to modify schedule colors, add your company logo, and add pictures or videos to your schedule.
You can create your own workflow with SuperSaaS, and discover some advanced features like adding a secret supervisor field, creating a custom drop-down menu, using URL extensions to enable several hidden options, and much more.