Manage payments
If you use manual, online and/or credit payments, you can use these tips to manage payments, handle exceptions or make refunds.
Below you will find:
- interpret payment status icons on bookings
- deal with pending, timed-out, or refunded bookings
- work with pay-later or credit-related exceptions
Payment overview and management
You can see a table with the payment status of each appointment by going to the Supervise page. The and icons are used to indicate payment status; indicates payment is pending, while means payment was completed and the booking approved. For the credit system, indicates the booking was (partially) paid with credit. Furthermore, indicates that payment is in progress, while signals that the user has chosen to pay later. There are a few more symbols related to payment failures that can be found in the list of status codes.
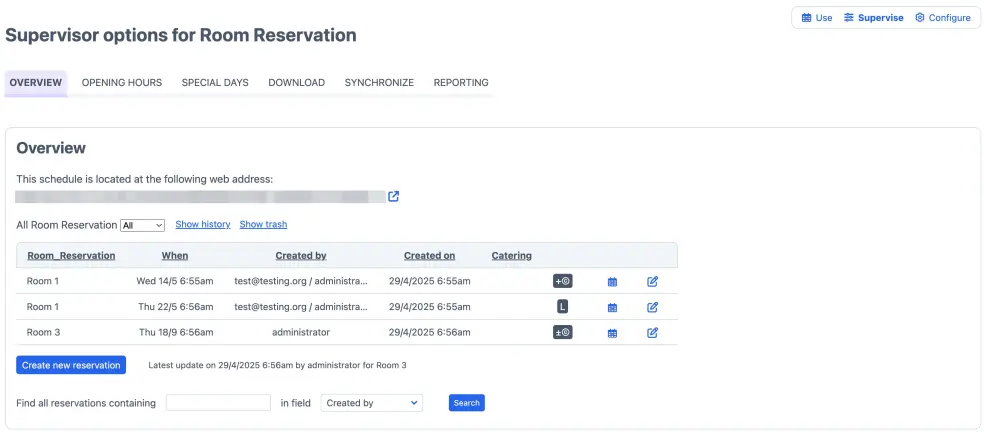
If you chose to work with manual payment via bank transfer, check or Venmo, appointments will be shown as pending approval: in your booking calendar. Once you receive payment you will have to manually approve the booking (see Managing appointments and customers).
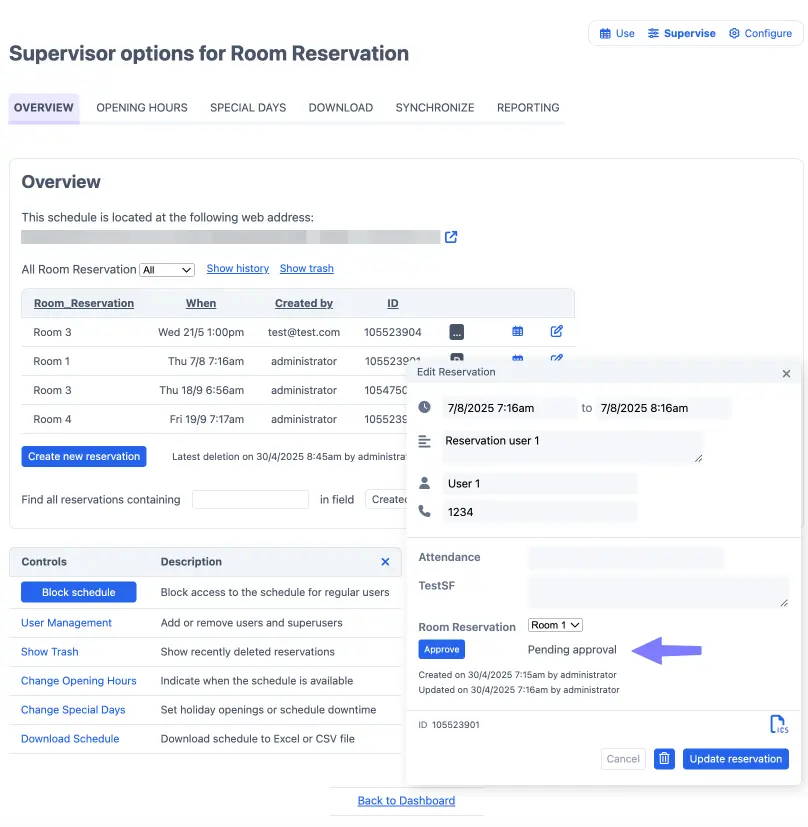
Adjust the payment status
There may be times when you need to override the approval process manually. For example, you may want to mark a booking as paid because you want to give it away for free or have already received payment through another channel. When viewing the booking details as administrator, you will see either or , which can be used to override/revert the current status.
Restore timed-out bookings
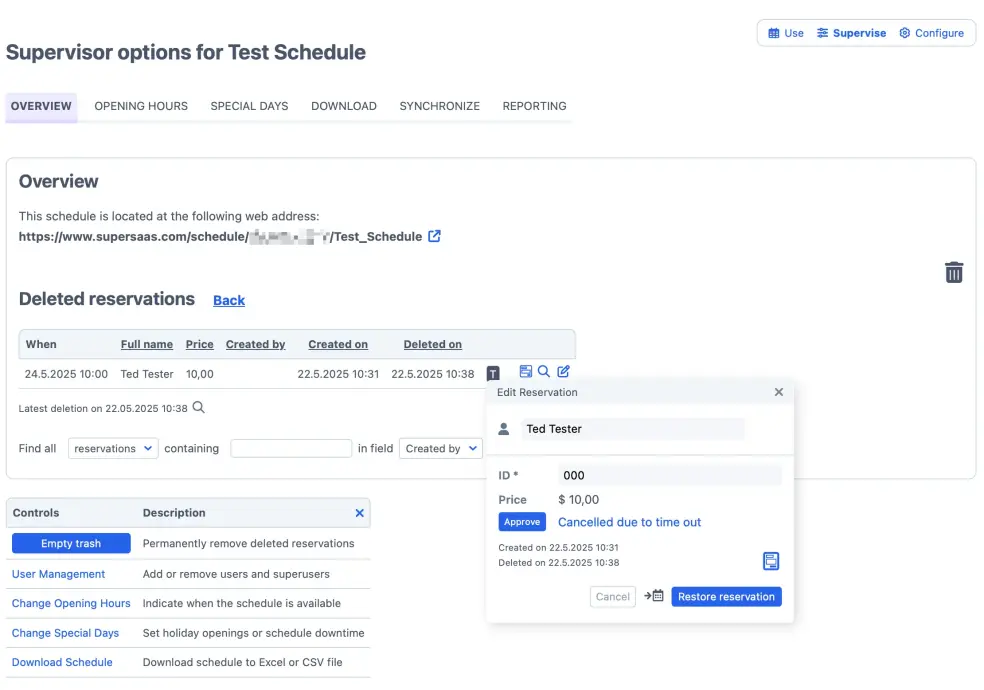
When a user makes a booking but doesn’t complete the full payment process, the booking will be timed out after about 15 minutes and is moved to the trash to avoid taking up a spot. In the trash, timed-out bookings are marked with a icon. In order to restore a booking after it timed out, navigate to Supervise > Overview > Show trash, click the icon to the right of the booking in question and then click .
If a user takes more than 15 minutes to pay and payment comes in after an automatic time-out, the related booking is automatically reinstated from the trash. In this case there is a very small chance that another client has taken the spot in the meantime. If this does happen, the administrator will receive an email to alert to resolve the double booking manually.
Allow users to pay afterwards
In many businesses it’s customary to invoice the customer after the service took place, not at the time of booking. In that case the invoicing functionality is useful. Invoicing can also be used if you want your customers to pay before the service, but not necessarily at the time of booking.
However, in some cases you may want to give your customers the option: pay beforehand, or pay afterwards. In that case you can enable the option “Ask for payment but allow the user to pay later” on the Configure > Process page. The customer will see an additional “Pay Later” button in the checkout screen that they can click to skip payment. Their booking will be marked with an icon. Note that in that case you will have to take care of payment collection yourself, the customer is no longer at our site so we cannot collect it from them.
A special case of the above is the option “Waitlisted users do not pay until they receive a placement” on that same page. The customer will bypass the checkout screen entirely if they are on the waiting list. If you use the credit system, and the customer does receive a confirmed place later on, then the system deducts the price from the user’s credit.
You may wonder what happens if someone is on the waiting list, but by the time they get a confirmed place they no longer have credit. Perhaps because it was spent on another appointment in the meantime. In that case the system will check whether the option “…allow the user to pay later” is enabled. If it’s enabled then the user gets the place, and their status stays at “Pay Later”. If users are not allowed to pay afterwards, then that user is skipped, and the next person on the waiting list gets the place (assuming they have enough credit).
Refunds
When you use online payment and want to refund a customer, you need to do so via your payment provider. After you refund the payment through your payment provider, the associated booking will automatically be marked as refunded in your booking calendar and moved to the trash. Note that if you or your users cancel a booking in your online booking calendar, it will not be automatically refunded at your payment provider. In fact, we do not have permission to change your payments after they’ve taken place, which makes sense from a security perspective. So nothing you do on your calendar will affect your payments.
If you’ve enabled the credit system and allow users to cancel their bookings, credits will be automatically refunded once a user cancels a booking.
Manage credits
You can update individual users’ credit levels via User Management. If you need to make mass changes to all user data, you can export the customer database to a (comma-separated) CSV format via Export. You can then apply the changes, save the file and upload it again via Import. Note that Import only allows CSV files.

Under Access Control you can choose to have your users’ credit level automatically reset to a predefined value on the first day of each month.